Please don’t share this page with others as it is intended only for those who have purchased Dwight Clough’s How to Write and Publish Your Book course…
Lesson #9
Designing your book inside and out
What marks you as a rank amateur faster than anything else? Is it poor writing?
Surprisingly … No.
Instead, one of the biggest mistakes I see new self published authors making is poor design. The book cover is poorly designed, and, just as important—but less recognized, the interior of the book is poorly designed. Nothing shouts “amateur” louder than poor design.
How do you fix this? You can hire a graphic designer. Nothing wrong with that. Find someone who has experience with books, and ask to see samples of their work.
Or you can do it yourself. In this lesson, I’m going to explain how to design your book’s interior and your book’s cover using simple design principles and software you can download for free.
Note: The advice I’m giving here is based on publishing with Amazon. If you are using a different publishing or printing service, then you’ll need to get specifications from that service and adapt my recommendations accordingly.
Design your book’s interior
Let’s start with your book’s interior. Most first time authors vastly underestimate the importance of a well designed interior. Your writing can be brilliant, your message profound, but if the page is uninviting to read, your readers won’t read it. Sorry. They just won’t. Your book will have a low quality look, and your readers will assume the message or story is low quality as well.
You need to design your book’s interior before you finalize the cover because you need to know how many pages your book will be in order to calculate the size of the spine.
I use LibreOffice for nearly all of my book projects. LibreOffice is a free alternative to Microsoft Word. You’ll find a download link below. LibreOffice is a powerful word processing program, and I like it better than Word, but the two are very similar and you can use either one.
Why not a desktop publishing program like Adobe InDesign? You can definitely use InDesign. It is pricey, and it’s not user friendly. But it does have capabilities that no word processing program is going to be able to touch. Having said that, in the vast majority of cases, LibreOffice will work just fine. Here’s the exception: If you need your artwork and images to extend to the edge of the page, then you need an interior with a bleed. In that case you’re probably better off going with Adobe InDesign. While I’ve done some work with InDesign, I don’t have enough experience to be a competent coach with Adobe products. However, many graphic designers work with InDesign every day and can help you.
Step #1 Create a clean document
Most people without even knowing it add a great deal of formatting to the book manuscript they create with a word processing program like LibreOffice or Word. In most cases, the formatting hurts more than it helps, and you need to get rid of it in order to design your book’s interior. In most cases, here’s the simplest way to do that.
- Select all the text in your book. (CTL-A in Windows)
- Copy (don’t cut, but copy) it to your clipboard.
- Paste it into Notepad or a similar text editor that takes ALL the formatting out of the text.
- Close your source document.
- Create a new document in LibreOffice.
- Select all the text in your Notepad document.
- Copy it to your clipboard.
- Paste it into your new document in LibreOffice.
Of course, if your document contains a number of images, charts, special formatting that you want preserved in your book, then the above process won’t work. Instead, keep your source document, but save it as a new document in LibreOffice with a new name like “book interior” or whatever. That way, if something goes wrong, you still have your source document (manuscript) to go back to. As you work on your document, you’ll probably need to adjust the formatting of these individual elements.
By the way, you’ll need to decide whether the interior of your book is going contain any color. Most books will not. Here’s why: Even one drop of color on one page inside your book nearly triples the cost of author’s copies of your book, and requires you to charge a much higher price. I have published a couple books with color interiors (a textbook, and a holiday book), but, as a rule I go with black & white. (The cover of your book, of course, is expected to contain color, and there’s no additional charge for that.)
Step #2 Decide on a trim size and format the page
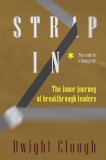
You start your design by choosing a trim size. The trim size is the dimensions of the book. If you’re not sure what to use, you probably want 6×9. That’s six inches wide and nine inches in height. That’s the size of most trade paperbacks. It communicates more value than a smaller trim size. I also often publish in 5×8. That trim size communicates: “This book is easy to read.” If you’re working on a textbook or a book with a number of charts or images, you may want to go with a larger trim size like 7×10, 8×10 or 8.5×11.5. I’ve published in all of those sizes.
Amazon offers a wide range of trim sizes which you can find here.
Assuming you’ve decided that your book’s interior is NOT going to need a bleed (see above), then you’ll want to format your page so that it matches the trim size.
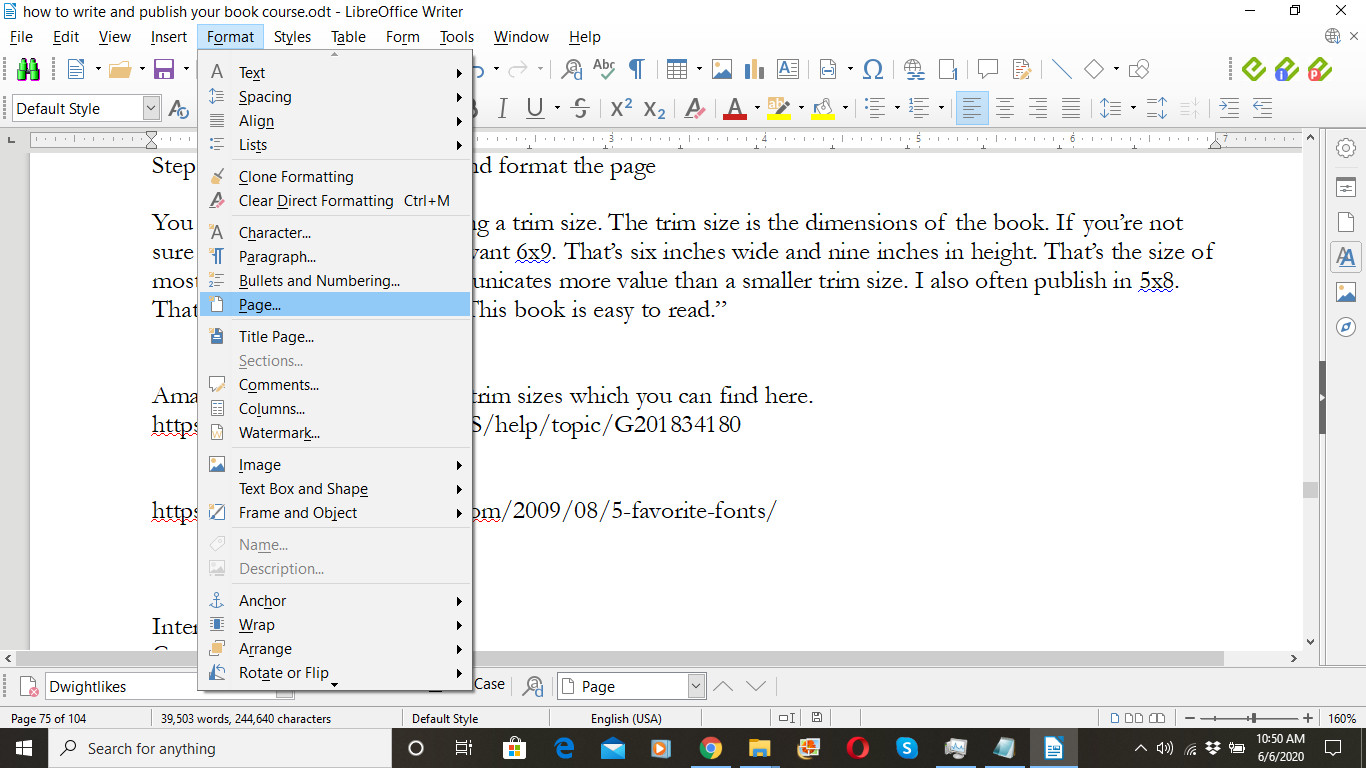
In LibreOffice, choose the page tab, and enter your trim size. In this case, I went with 6×9. Then you’ll want to select “mirrored” margins. You want to set your inner margin at 1.2 and all the other margins at 0.7. The inner margin is the part of your book that will be next to the binding. When you open the page, less of that side of the page will be visible. That’s why you want to set a greater margin on the inside. You can play with these settings a bit, but I’ve tried different settings and these seem to look best.
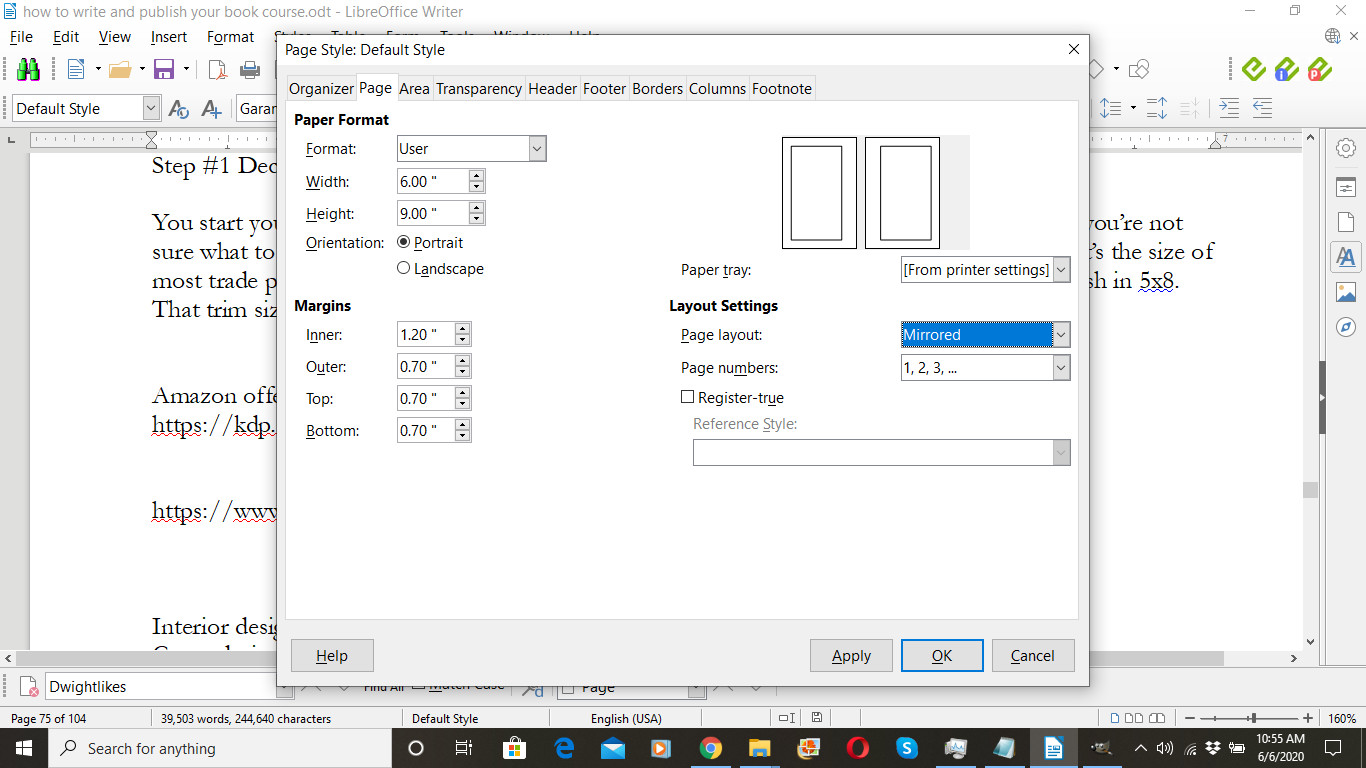
At this point you can decide if you want any headers or footers. In this example, note how I checked “Footer on” but unchecked “Same content on left and right pages” and I unchecked “Same content on first page.” I don’t want any headers or footers on my title page, the first page, so I always uncheck that one. And, as a rule, I like to put page numbers on the outside margin at the bottom. (Some people prefer to put page numbers elsewhere; look at several books and decide what you like the best.) That means the page number will be left justified on the even numbered or left hand pages, and right justified on the odd numbered or right hand pages.
Here’s how you insert page numbers. Place your cursor in the footer area.
On the Insert menu select “Page Number.”
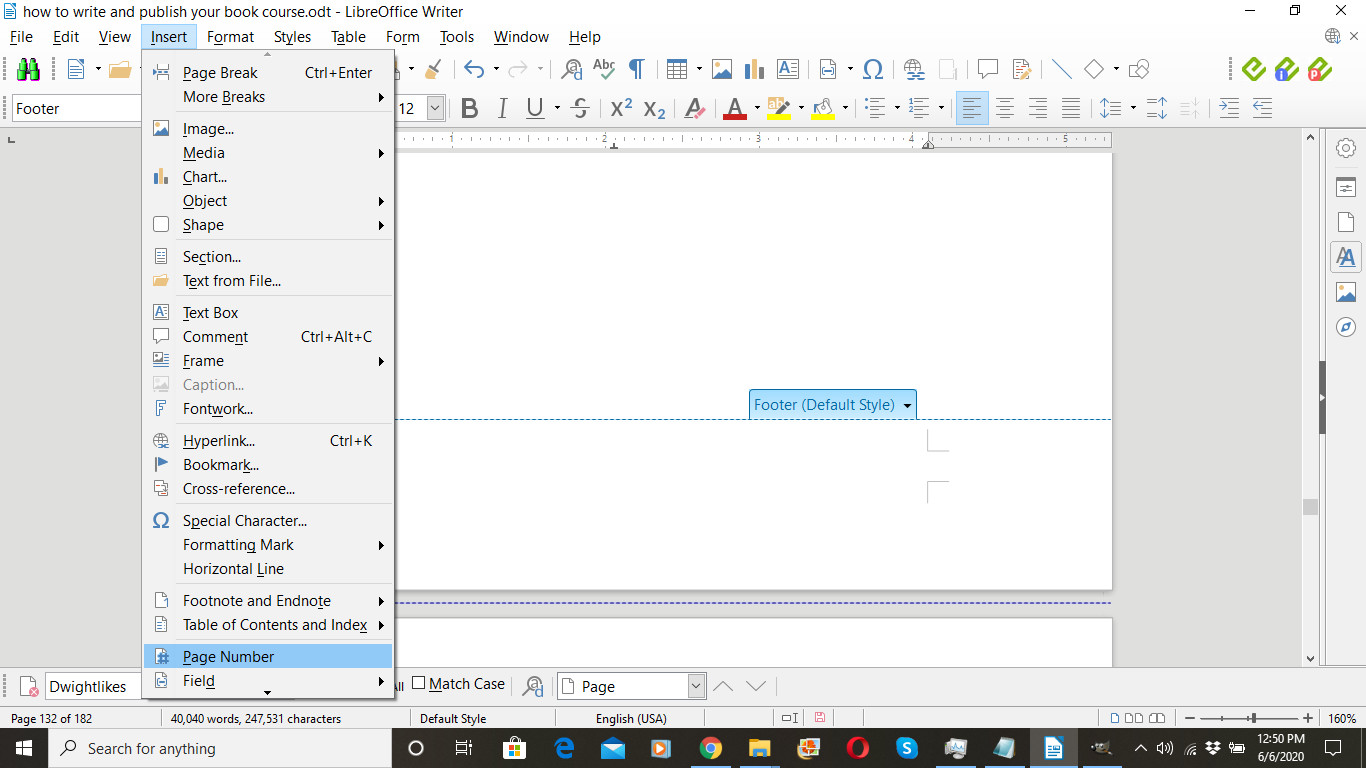
Of course, you can add any additional text you want, and you can format the page number and the text.
Note: Back in the Format Page dialog, I checked “Footer on”
but unchecked “Same content on left and right pages”
and I unchecked “Same content on first page,”
therefore,
I will NOT insert a footer / page number on the first page,
and I will need to insert a footer / page number on both an even and an odd page. Then my page numbers will appear on all pages except the title page.
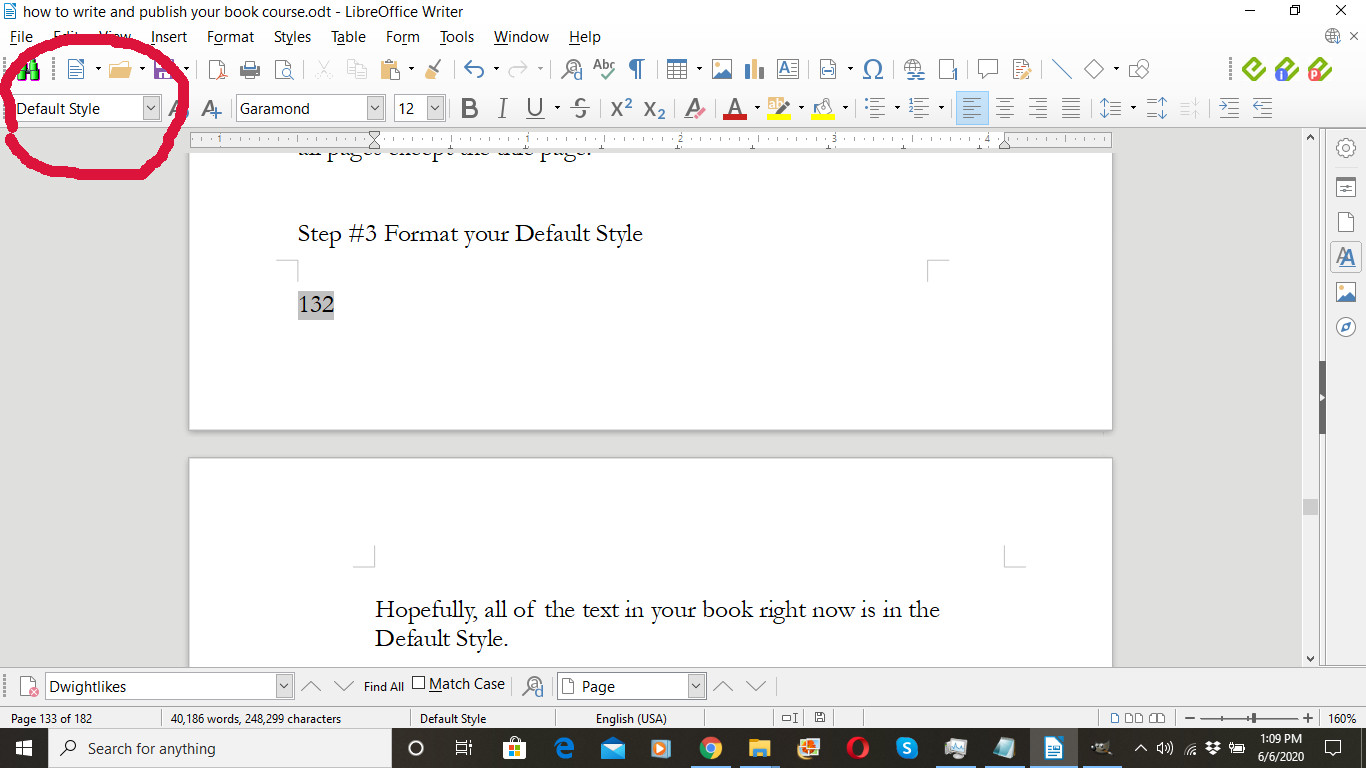
Step #3 Format your Default Style
Hopefully, all of the text in your book right now is in the Default Style.
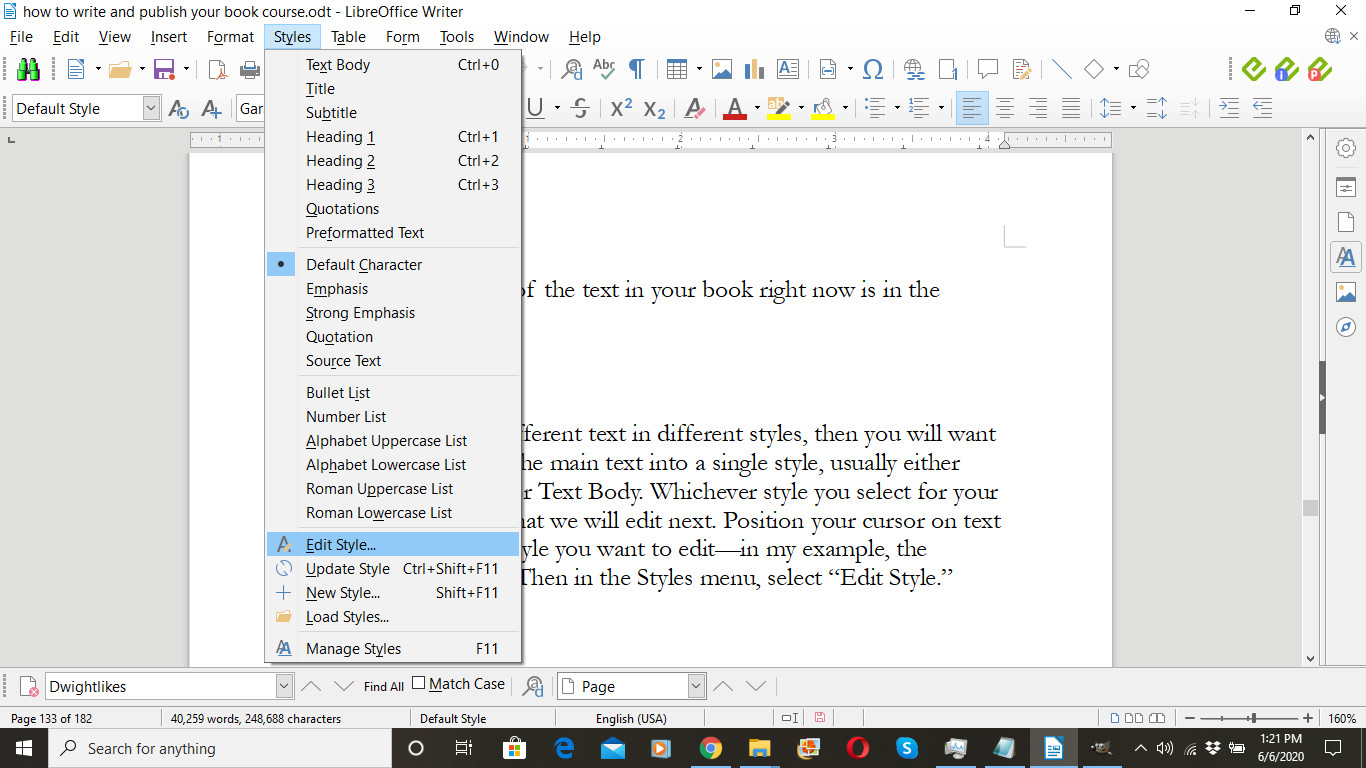
If you have different text in different styles, then you will want to convert all the main text into a single style, usually either Default Style or Text Body. Whichever style you select for your main text is what we will edit next. Position your cursor on text that is in the style you want to edit—in my example, the Default Style. Then in the Styles menu, select “Edit Style.”
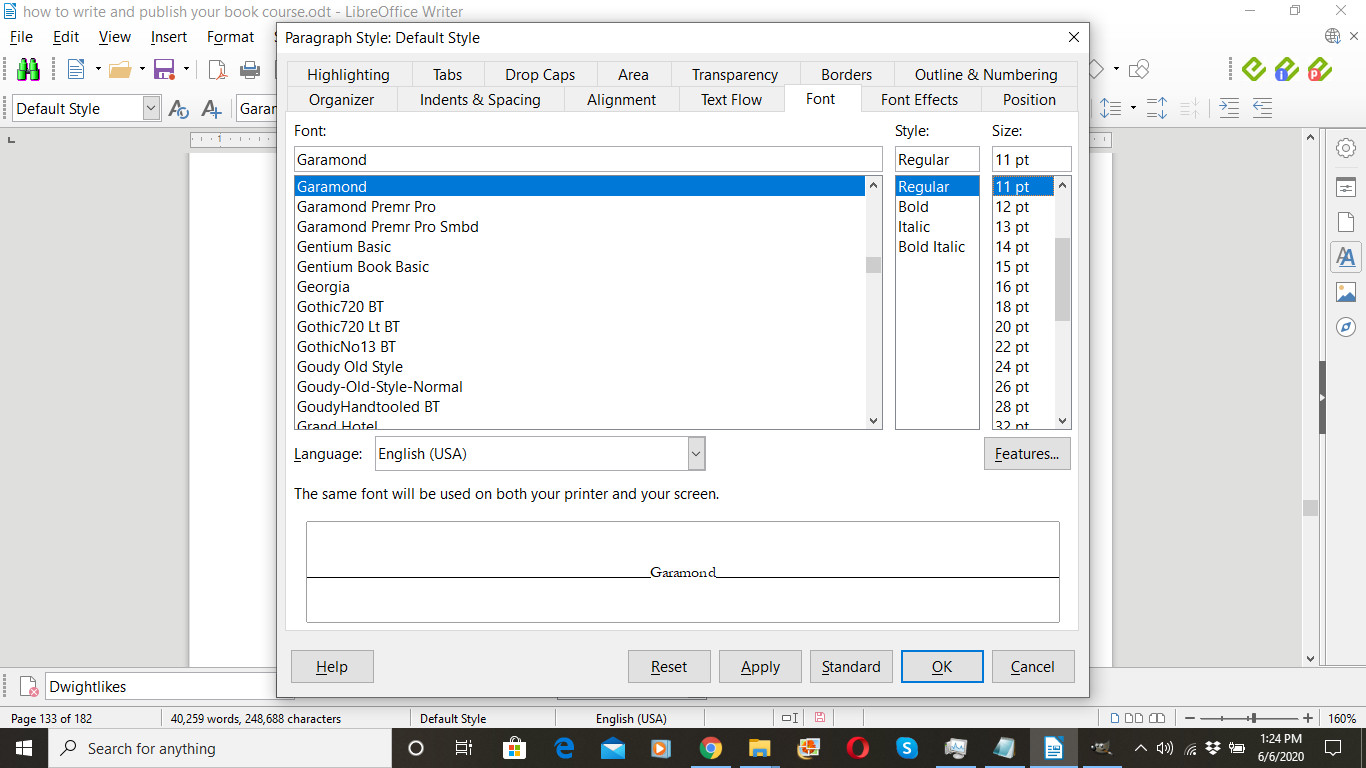
Start in the font tab. Select a font. This is the main font used in the book. There will be pages and pages of text displayed in this font, so you need to choose carefully. It needs to be a highly readable font. I recommend Garamond. I use it for most of my books. It’s very readable. I’ve also used Adobe Caslon Pro and others. Goudy is frequently recommended, and it also looks great. Here’s an article where a book designer discusses his favorite fonts for the main body of your book.
Fonts you do NOT want for the main body of text in your book:
- Comic Sans: Looks amateurish.
- Times New Roman: Overused, makes you look like a beginner.
- Any decorative font. Way too hard to read.
- Most sans serif fonts like Arial, Helvetica. Too hard to read. (Exception: Books intended for the visually impaired might need to be in a sans serif font.)
I recommend the book, Type & Layout. Based on research, the author explains which fonts are best for your purposes and why. See resources below.
Select a font, and print out two or three pages of text using that font. That will usually give you a good idea of how readable the font is.
Graphic designers recommend choosing a different font size than 12 point for your book. Usually I recommend 11 point unless you’re writing a large-print book.
You will want to visit the indents & spacing tab.
For most books, you’ll want the first line of each paragraph indented. Do that here. If you put tabs or spaces at the beginning of each paragraph, I recommend you take them out and use this instead. (The easiest place to do that is in Notepad with Format—Word Wrap turned off.)
I recommend you do NOT place an extra hard return to create a blank space between paragraphs. If you want a space between paragraphs, enter it here.
Notice that I changed Line Spacing from Single to Proportional, and then I set it at 105%. Try different values between 105 and 115%. Print out a few pages to see what is most readable.
In the Alignment tab, you will usually want to select Justified. An exception might be a book of poetry.
In the Text Flow tab, under “Hyphenation,” I normally check the “Automatically” box, and set the number of “Maximum number of consecutive hyphens” to 2.
Keep tweaking these settings until the pages of your book are inviting and highly readable.

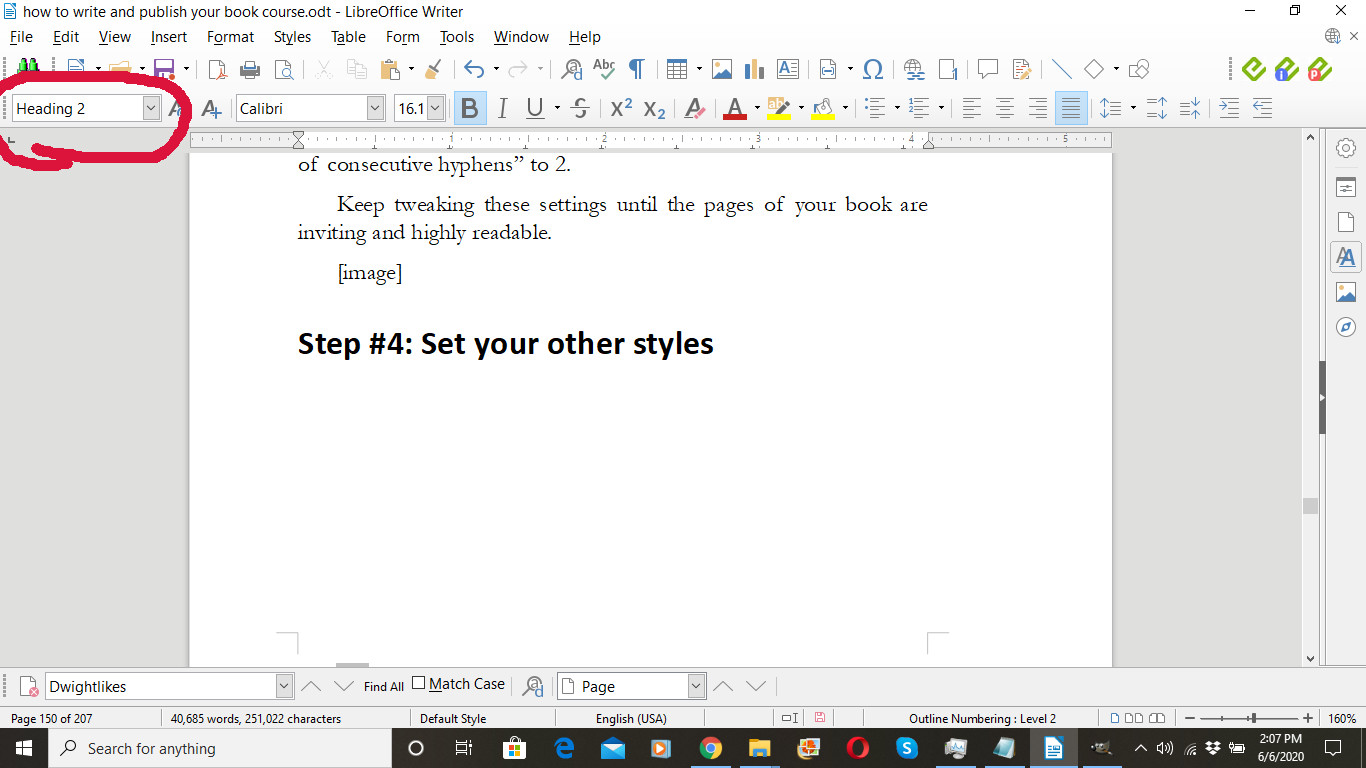
Step #4: Set your other styles
In your book, you may have chapter headings, subheadings, captions, quotations, sidebars, etc. Use a different style to format each of these. You use styles so that you can make global changes. For example, you can change the look of all the subheadings in the book at once. In addition, styles allows you to have a consistent look for the same elements throughout your book—all epigrams will look the same, all subheads look the same, all captions look the same. This type of repetition is a trait of good design. I recommend you read the Nondesigner’s Design Book—see the resources below.
For your headings, you may want to go with a contrasting font. Assuming you’ve used a serif font like Garamond for the body of your book, then a sans serif font like Calibri might work for your headings. Again, experiment with several different fonts to see what works best in your situation. While you can use the same font for your headings as you use in the main body of your book, you do NOT want to use a similar font. For example, I’m not going to use Garamond for the main font and Adobe Caslon Pro for the headers. That would be jarring for the reader. (Again, Robin Williams’s book on design, Nondesigner’s Design Book, has been very helpful on these points. See resources below.)
For your headings, you may also want to experiment with different weights or boldness. Sometimes there will be “light” or “thin” or “condensed” version of a font, and it may or may not look good for a heading, especially if the font size is much larger (e.g., 18 point). If you go with bold or “heavy,” you might try not increasing the font size and see how that looks.
I recommend you left justify (not full justify) headings, and I recommend you turn hyphenation off.
You will probably want to adjust the spacing above and below the paragraph for your headings.
Generally, you’ll use Heading 1 for chapter titles, Heading 2 for subheads within a chapter, and Heading 3 for sub-subheads. This will be important when you create your Table of Contents.
You may also want to experiment with borders for headings. I sometimes place a single line under the heading, turn the padding to 0, turn off the padding synchronization, then increase the bottom padding number.
When you start a new chapter, you’ll want to force it onto a new page. You do this with Insert > Page break, or CTL-Enter in Windows.
When you finish your book, you’ll need an even number of pages. This is because the printer will print on both sides of the page. If you have an odd number of pages, you will want to insert an extra page somewhere.
When you finish designing your book’s interior, you’ll export it as a PDF. You need to do this because Amazon prefers to print from a PDF, and I would never trust my book’s printed format to a Word doc. LibreOffice offers a one-click export using the pdf icon in the toolbar. Or you can use File > Export As > Export as PDF.
However, IMPORTANT, you’ll need to include cover art credits, if any, on your copyright page. I’ll talk about that below when we discuss creating your book’s cover.
IN ADDITION, I recommend you include your book’s ISBN on the copyright page. For example, in my book Adding Value, I have listed the ISBN on the copyright page like this:
Paperback ISBN: 9798648709874
Note that I use the phrase “Paperback ISBN.” The ISBN does not apply to your e-book if you create one.
When and where do you get your ISBN? The simplest way is to get a free ISBN from Amazon as one of the steps in the publishing process. However, if you prefer, you can purchase an ISBN from Bowker here.
bowker.com/products/ISBN-US.html
Once you have your ISBN, add it to your copyright page. For me, that is usually the very last step I take before exporting a final pdf that I plan to upload during the publishing process.
By the way, each time I export a copy of my book to PDF, I include a date in the file name. For example:
Adding Value book interior 2020 06 08.pdf
That way I can make sure that I’m uploading the most recent version of my book when it comes time to publish. (If you export multiple times in one day, you could include the time in the file name as well.)
Congratulations! You’ve created a printable interior file for your book!
Designing your book’s cover
You can always hire a graphic designer to create your book’s cover for you. You’ll need to give him or her specifications, which I’ll talk about in a moment.
While you can create your book’s cover in Adobe InDesign, Adobe Illustrator, or Adobe Photoshop, But I’m going to assume you don’t have that software, and I’ll show you how to create your book cover using GIMP, a free image editing software program that works on Windows, Mac, or UNIX.
Link to download GIMP is below.
And, yes, Amazon does have a “Cover Creator” utility in the publishing process. I used it once, years ago, and I wasn’t real happy with the results, so I haven’t tried it again. It may have improved considerably since, and you might have wonderful results with it.
By way of disclaimer, I should say that one of my sons is a graphic designer. He designs some of my book covers for me, and some of them I design on my own.
Let’s create a book cover together.
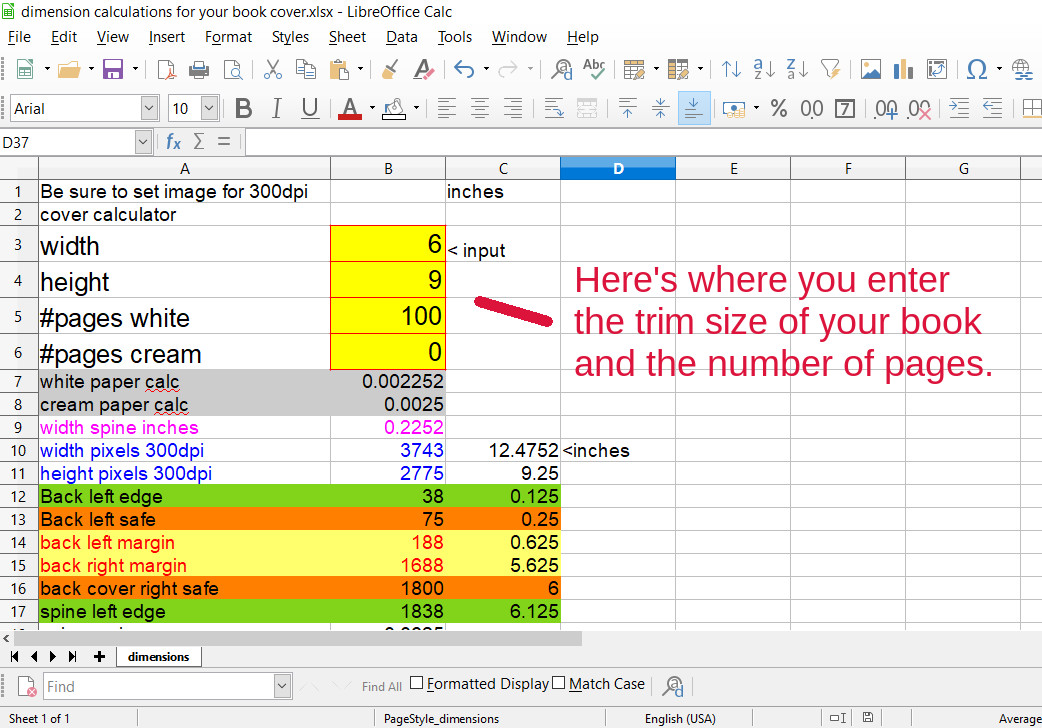
Important! Once you’ve installed GIMP, you’ll want to download my dimensions file here.
(The file is in Microsoft Excel format, so it will open in Word or in LibreOffice.)
For our example cover, we’re going to say that our trim size is 6×9 inches, and we have 100 pages in our book. You can adjust these numbers to fit your own book’s properties. Once you do, all the other numbers on the page should update.
By the way, I usually select white pages as opposed to cream pages in the publishing process. I like white better, but the cream pages are just a bit thicker and so it changes the dimensions if you use cream. Some people prefer cream for novels believing it makes the page more readable. I prefer white. But you gotta decide right here; otherwise your dimensions will be off and your cover file might not be printable. Do NOT enter a number greater than zero in BOTH white and cream; choose one or the other.
By the way, you cannot choose cream paper if you go with any color in the interior of your book; you must choose white paper.
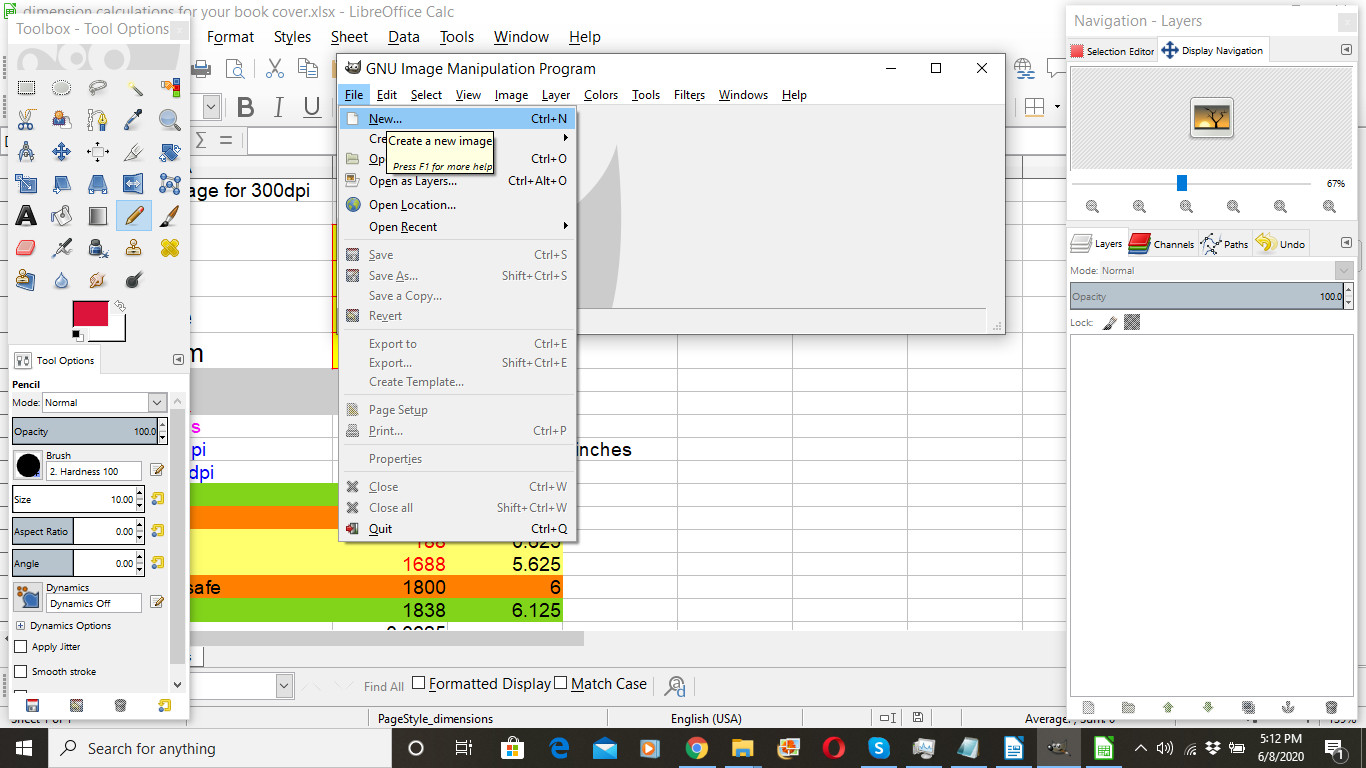
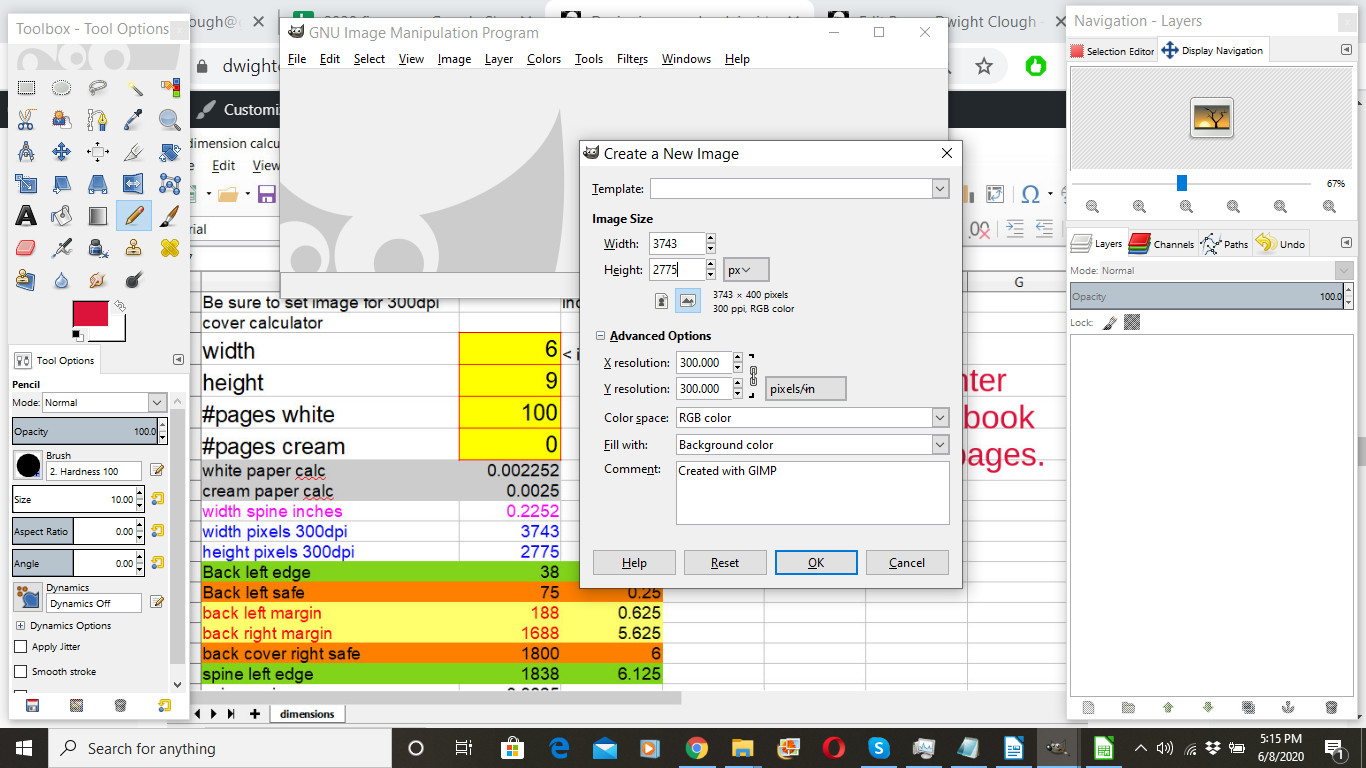
Next you want to open GIMP and go to File > New.
In the menu that pops up, you want to enter the dimensions from lines 10 and 11 from your dimensions file. I always enter values in pixels.
IMPORTANT: Click on “Advanced Options” and set your X resolution and Y resolution to 300 as shown here. Your cover file will be saved at 300 dpi (dots per inch) which will be the correct resolution for printing.
To create a printable cover file, we need to have four elements:
1. Front cover
2. Back cover
3. Spine
4. Bleed
All of these will be combined into one large image that the printer will use to create your paperback cover. The back cover will be on the left. The spine will be in the middle. The front cover will be on the right. And the bleed will be the edge all the way around. We will set the bleed at 1/8 inch. In the printing process, the printer will trim off the bleed and it will not be part of the book cover. This allows the printer to print the image on your book cover all the way to the edge of the cover. That’s why we’ll want to have an image that extends beyond the edge of the printed book cover, knowing that a small amount of that image will be trimmed away.
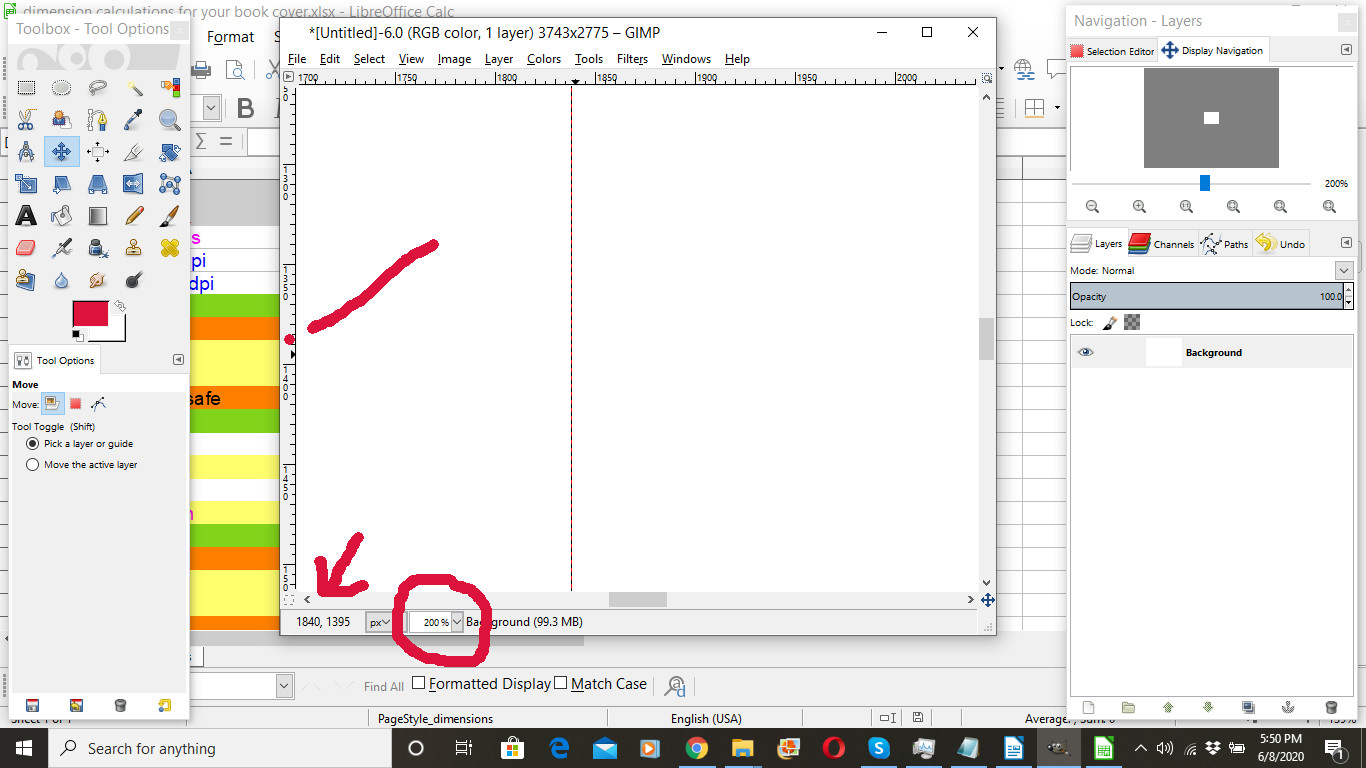
Now we’re going to set some guides. This will help us know where to position our text and our artwork. Guides are lines that we will be able to see while we’re working on our image, but these lines will NOT be visible when the book cover is printed.
One of the purposes of the dimensions file is to show you where to place these guides. The first guide we will put in is from line 17. This will show us where the left edge of the spine will be.
In the image below, you’ll see the steps for setting the guides.
Step 1: In the toolbar on the left, make sure that the cross-shaped icon is selected.
Step 2: At the bottom of the image window, set the zoom to 200% or higher. (Inside the red circle)
Step 3: Use the bar at the bottom of the image window to position yourself about in the middle of the image (on the left-right axis—there’s a separate bar on the right for positioning up or down).
Step 4: Position your cursor on the left edge about where the dot is.
Step 5: Press and hold down your mouse button and drag the guide line to the right.
Step 6: Watch the numbers (see the arrow). The first number will tell you where you are on the right-left axis.
Step 7: Release your mouse when the number corresponds to the number in column B of line 17 of your dimensions file. In my case, the number I want is 1838.
Use the same process to set guides from the following lines of your dimensions file:
Line 17: Spine left edge
Line 22: Spine right edge
Line 14: Back left margin
Line 15: Back right margin
Line 24: Front left margin
Line 25: Front right margin
Line 30: Top margin
Line 31: Bottom margin
When you do top and bottom margins, you drag from the top instead of from the left.
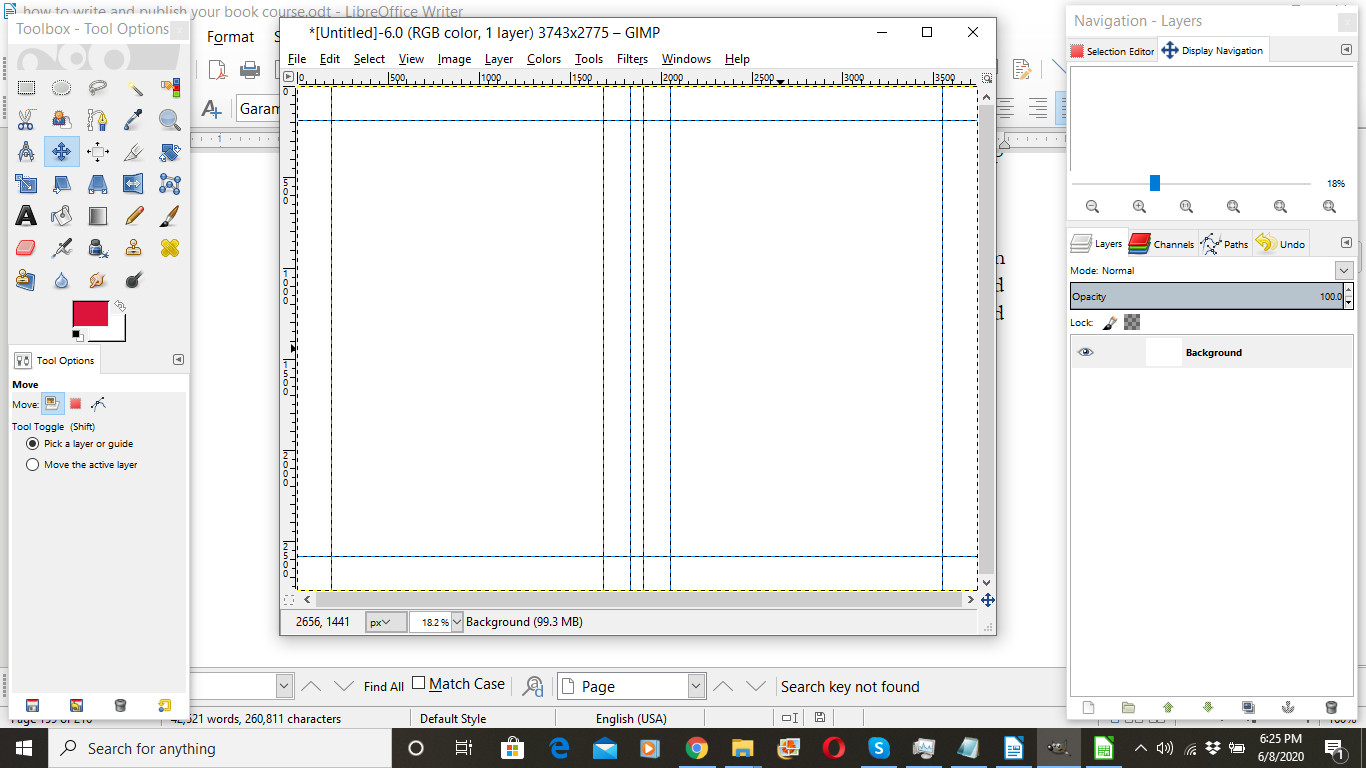
When you’re finished setting the guides, let’s adjust the zoom back to its original position, in my case, 18.2%. Your page should look something like this. (If it doesn’t, go to the View menu and make sure “Show Guides” is checked.)
Now I’m going to find an image to use on the cover. While there are many sources of good images (including your own photographs and illustrations), I like using Unsplash.com. Check the website for licensing restrictions, but the last time I checked Unsplash allows you to use the images for any purpose without attribution royalty free. (To protect ourselves, we are going to provide an attribution anyway on the copyright page.)
Here at Unsplash.com I found an image by Simon Berger that I like.
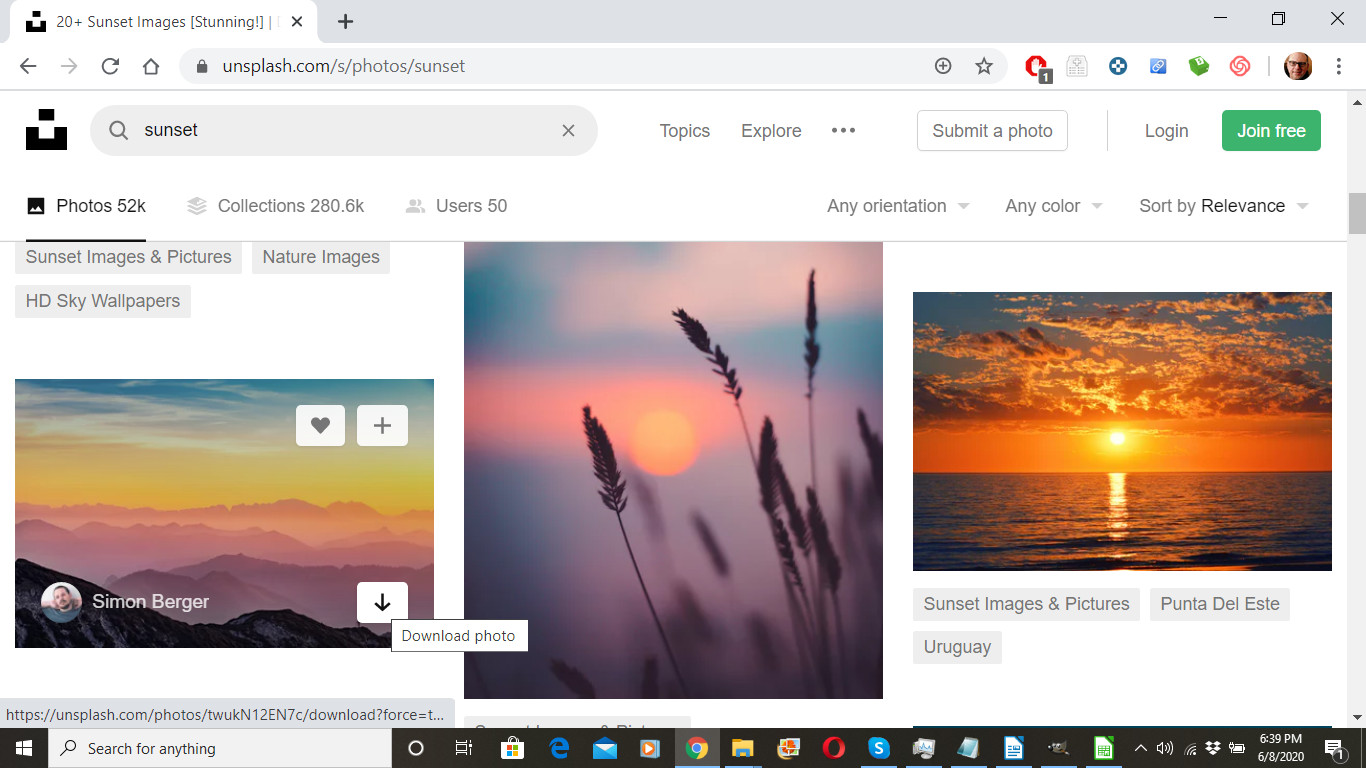
Is this image appropriate for your book? Probably not. Each book has different design requirements, but I’m walking you through the mechanics of the design to help you understand how they work.
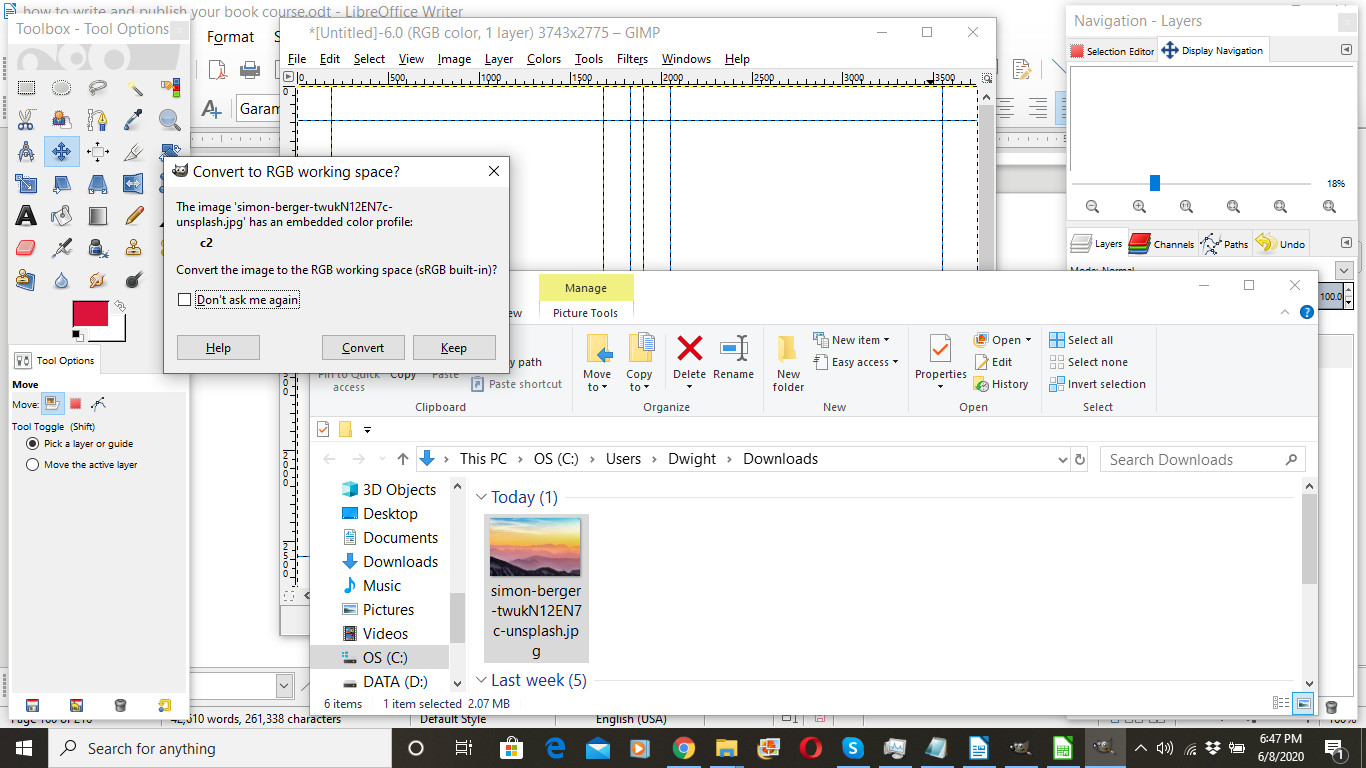
Download the image you’ve chosen. Then drag the image from the downloads folder to the GIMP image window. If you’re asked if you want to convert the color profile, click convert.
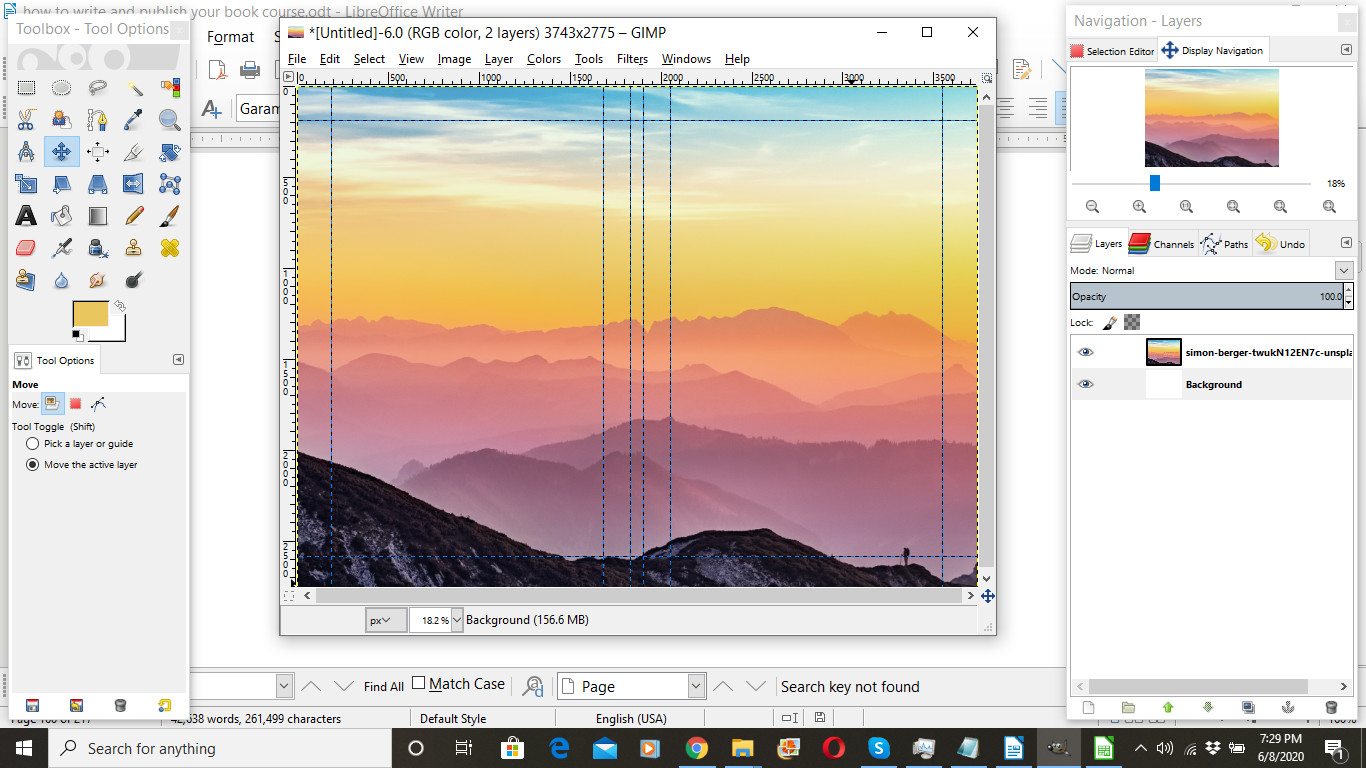
Once dragged into the image window, your screen will look something like this.
Be sure to save your image. File > save. Your file will save in *.xcf format. That’s GIMP’s native file format. You can later export it to a wide variety of other formats including *.psd (Photoshop), *.pdf, *.jpg, *.png, to name a few.
And I recommend saving your work every few minutes as you’re working. Nobody wants to spend an afternoon creating something only to have a computer crash wipe out all of your work.
You can adjust the size of the image in your window by making sure you’ve selected the layer you want to adjust on the right and then going to Layer > Scale Layer and adjusting accordingly. (However, I would NOT make the layer larger as that will make your book cover seem out of focus.)
Next let’s pick a color for the text we’re going to use on the front cover. I’ll do this by using the color picker tool to choose a color from the layer I have selected on the right.
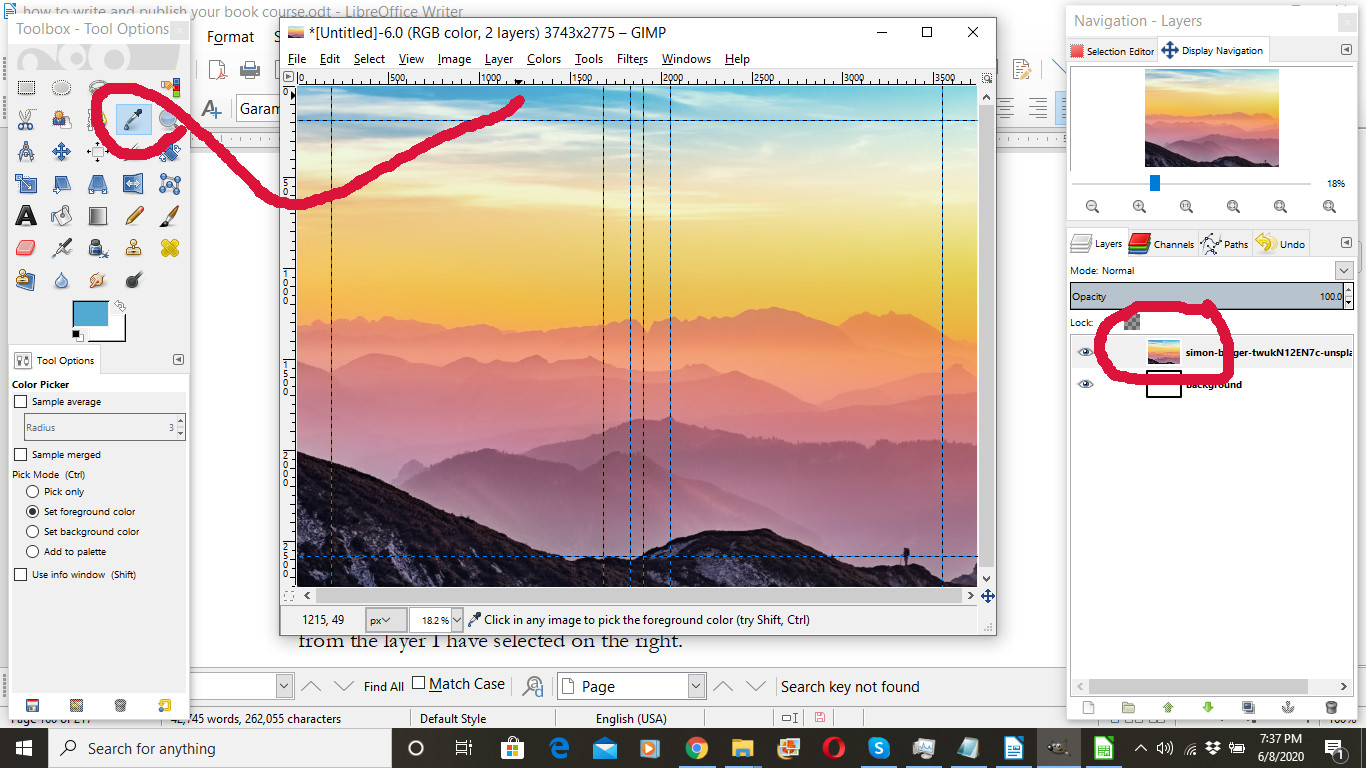
Again, is this color appropriate for your book? Probably not. But when we select colors from the image we’re working from, the design will come together better than if we just choose a color (including black or white) at random.
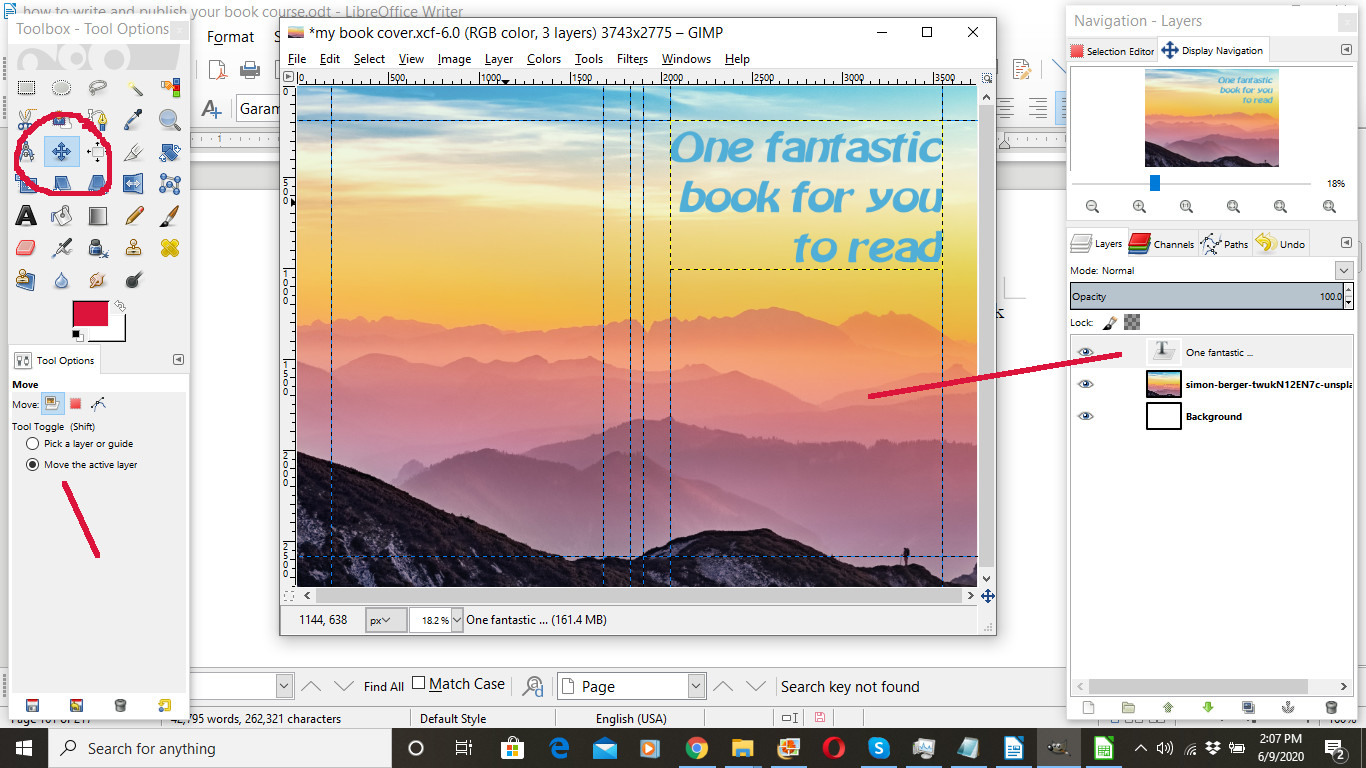
Next we’ll add some text. Choose the text tool, the one shaped like a letter “A.” Select a font, and choose a size. Here I used Batavia at 200 pixels.
I also chose right justification. While many people use center justification on book titles, you might try experimenting with right or left justification and see what it does to the look of your book cover. For a fuller understanding, I recommend you read Robin Williams’s NonDesigner’s Design Book linked below.
Then I entered my book title, “One fantastic book for you to read.”

Next I used my cross-shaped move tool to move the text layer (containing the book’s title) to the place I want it. Here I aligned it with the front cover margins. Be sure you have the correct layer selected on the right, and in the tool settings on the lower left, select “Move the active layer.”
HINT: In Windows, CTRL-Z will undo your actions, so if you make mistakes you can use CTRL-Z to undo them. The command may, of course, be different in a Mac or UNIX environment.
After adding any additional text or images to the front cover, I’m turning to the back cover. But first this note:
About the spine: At 100 pages, this book isn’t quite thick enough for words on the spine. I normally think about putting text on the spine once a book reaches 140 pages or more. On books this size, I create a text layer or two for the words I want on the spine. Then I select that layer, and go to Layer > Transform > Rotate 90° clockwise. Then I use the move tool to position the text where I want it on the spine. You can set additional guides on your image from lines 19 and 21 of your dimensions file. Your spine text will need to fall completely within those guides as Amazon normally will not print books with spine text outside those boundaries.
Back to the back cover. Before working on the back cover, you’ll want to set additional guides to make room for the bar code that Amazon will place on the back cover of your book. You’ll find the information you need to set these guides on lines 34 and 35 of your dimensions file. This will help you to identify where the bar code will go. You don’t want any text or essential images inside that area.
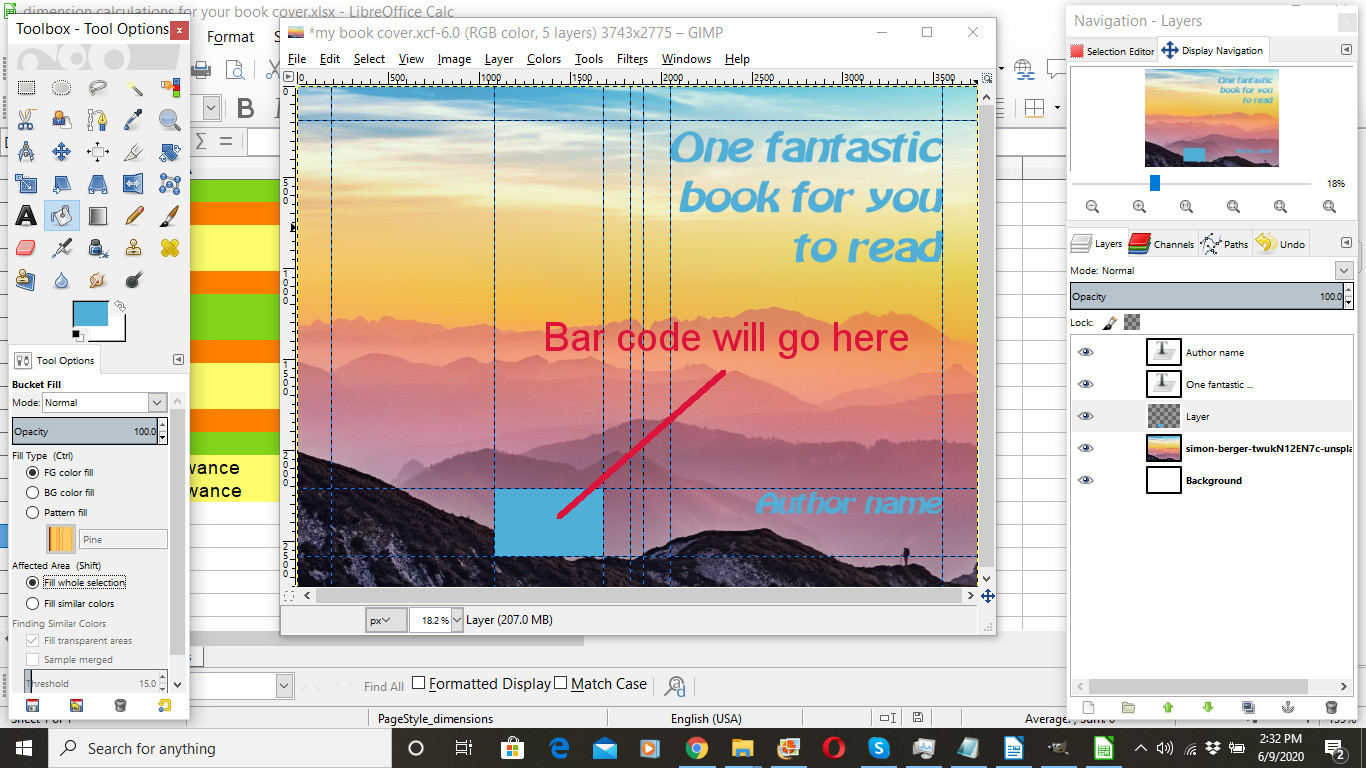
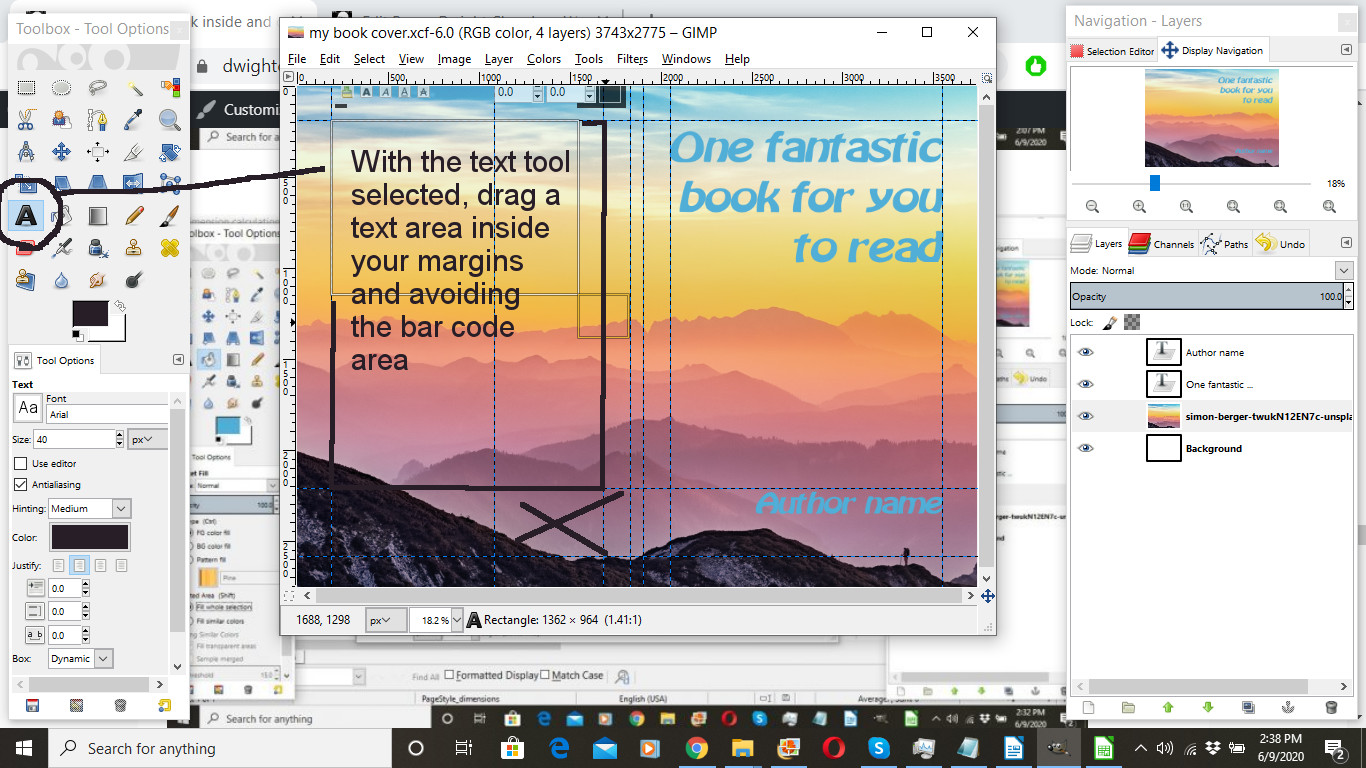
Using the text tool, drag a text area for you to insert text as shown below. I use the margin and bar code allowance guides to help me define my text area.
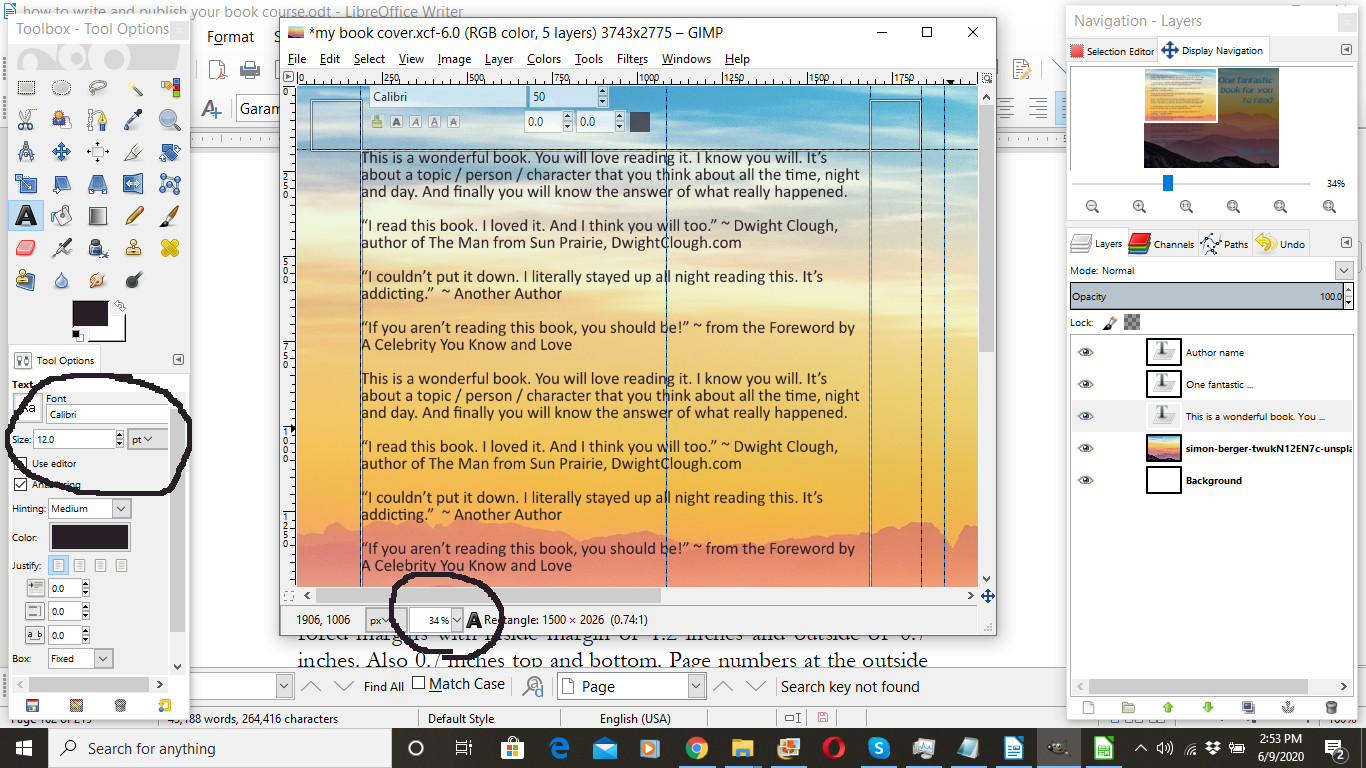
For the text (or copy) on the back cover, use your color pick tool to select an appropriate color. Choose a readable font. I chose Calibri. Adjust your zoom to 34% as I’ve found that gives me about the same dimensions on my screen as the printed book itself will be. I changed the size selection measurement from pixels to points, and chose 12 points for my back cover text. (I wouldn’t go much smaller than that.) Then I composed my back cover copy in LibreOffice. Then I copied and pasted it into the text area.
If you want to include additional images on your cover such as a photo of yourself on the back cover, you may. Find the image you want to include and drag it into the image.

If you need to, reposition this new image layer on your layer tool on the right so that it’s visible. If you need to resize the image, then use Layer > Scale layer. Then use the move tool to place the image where you want it on the cover.

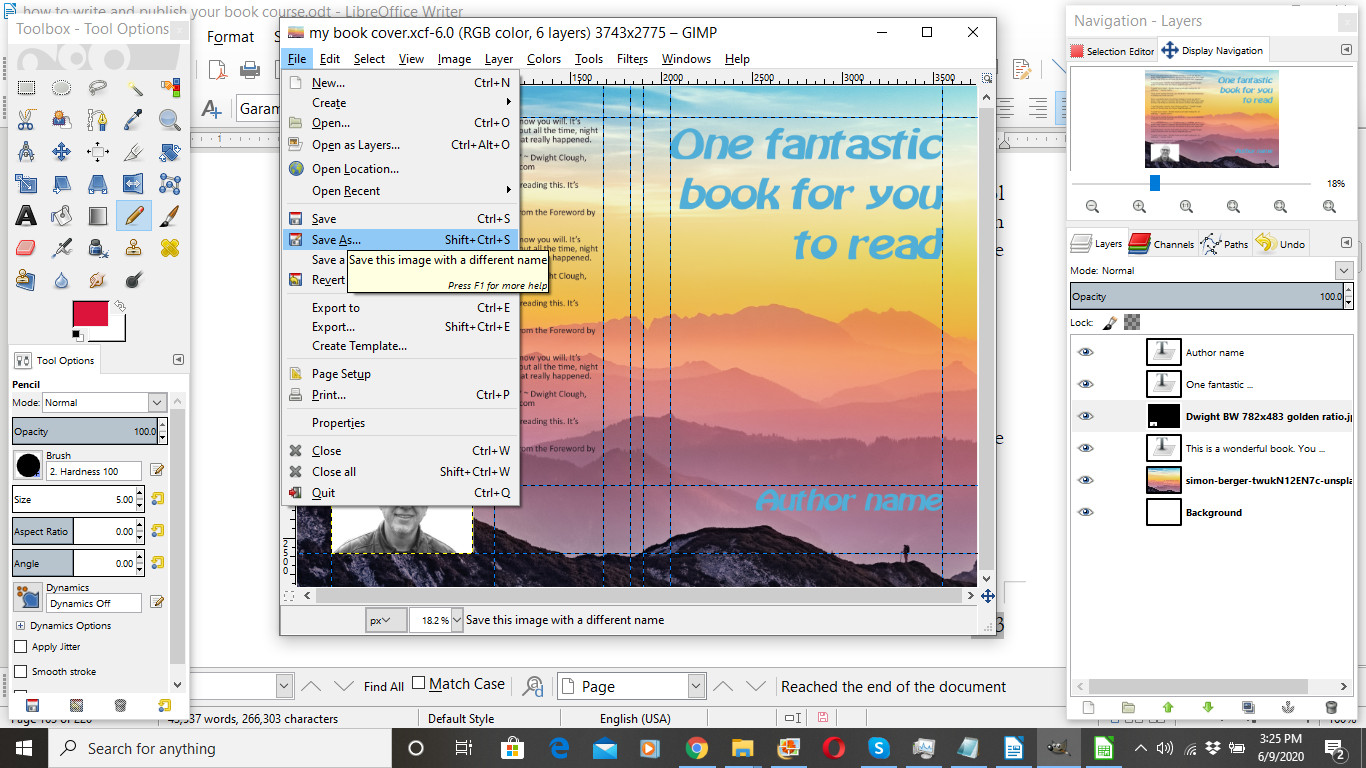
Once you’re finished with your cover, be sure to save your file one last time.
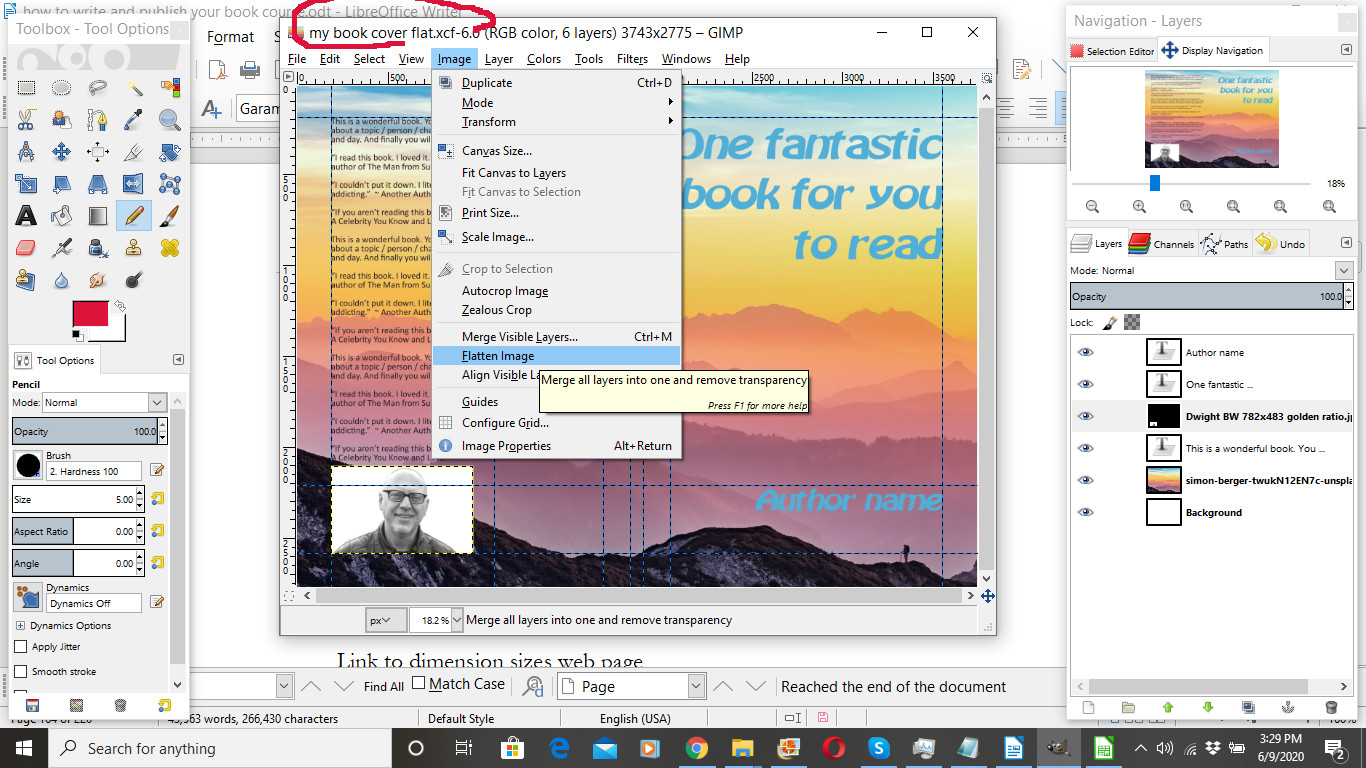
AFTER, you’ve saved your file, then you’ll want to SAVE AS and use a different file name. I usually add the word “flat” to the file name and then save. The reason we SAVE AS is to preserve our original layered cover image in case we need to go back later and make additional edits. It happens. Often.
Making sure we’re in the new file we just created, we next want to flatten the image. We flatten the image because the flattened image will export more easily to PDF, and we are aiming to create a PDF version of the cover.
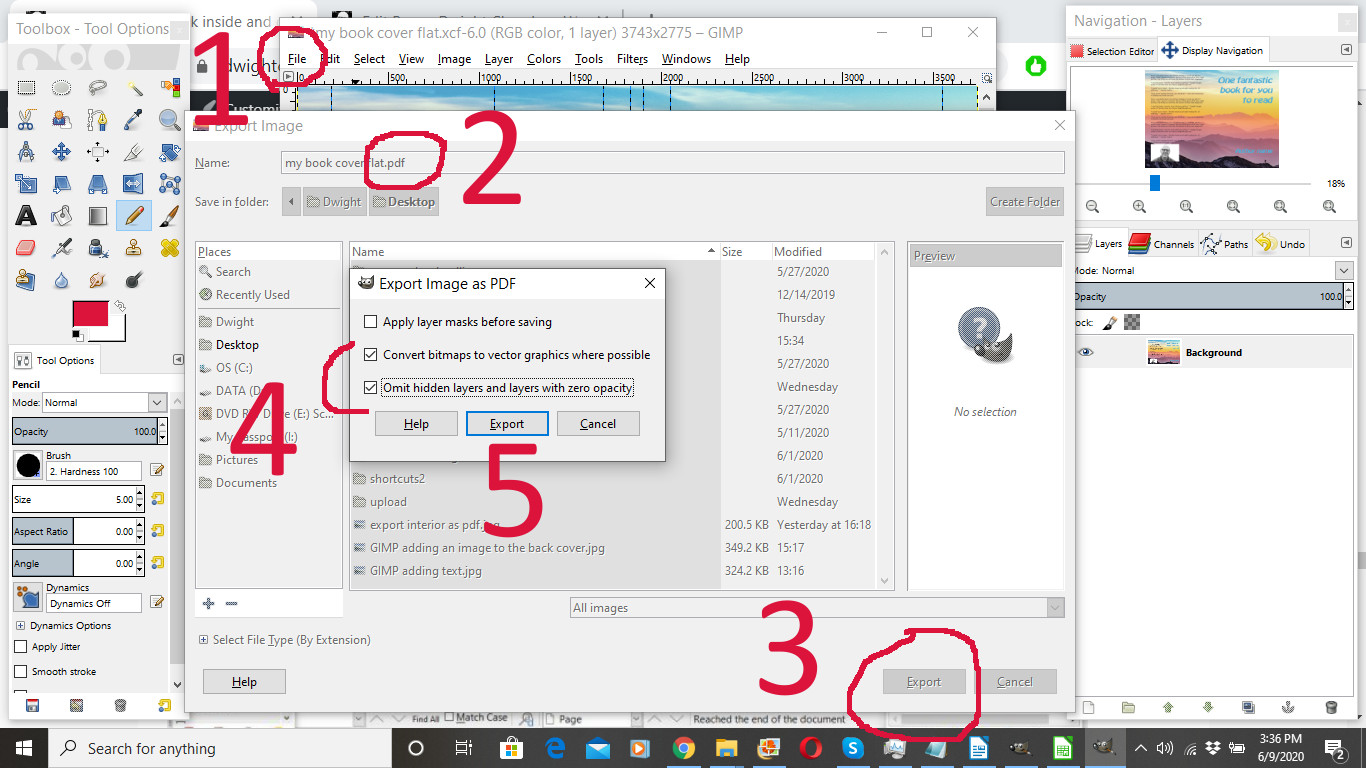
Next we want to export to PDF. Here’s how.
1. Go to the File menu and select “Export”
2. Change the file extension (the three letters after the dot) to pdf
3. Click export
4. Check the bottom two items in the export dialogue window
5. Click export
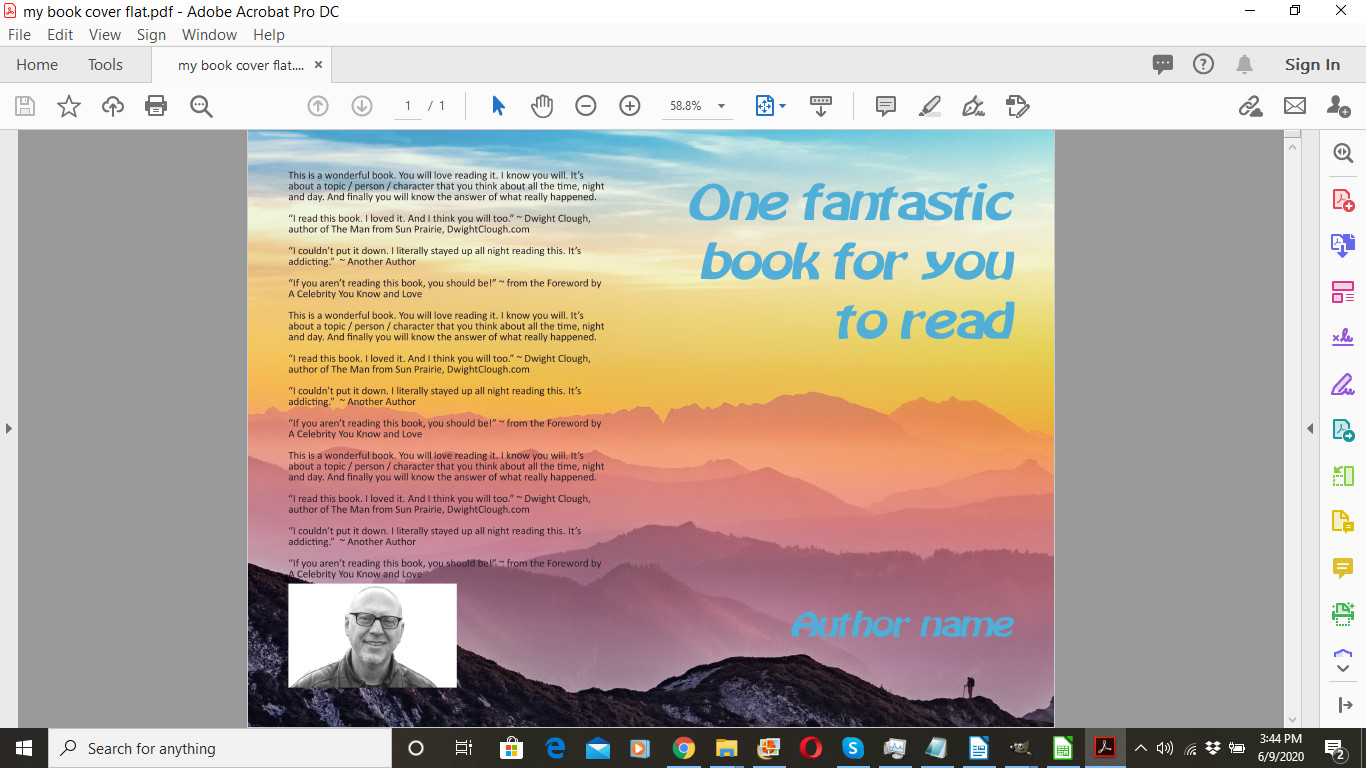
You’ve now created a printable PDF cover file. Let’s look at it Adobe Reader.
Notice that the guide lines are no longer visible. They will not be printed when your book is printed.
Before we go any further, we’re going to go back to the copyright page and update our cover credits. In this case I would use:
Cover design based on an image by Simon Berger from Unsplash.com.
Image of author on back cover based on a photograph by Hans Clough. Used by permission.
Now you are ready to publish. In the publishing process, you will add the ISBN to the copyright page, and export a final version of your book’s interior.
Coming up!
How to publish your book as a paperback for FREE. In this lesson, I’ll show you how to harness the power of Amazon’s publishing platform to get your book into print absolutely free. I’ll take you through every step of that process, frame by frame.
Course index and link to next lesson are below
Recommended resources and sample books
Yes, these are referral links so there is a danger that I might make money if you click through and purchase…


 On Writing Well, a classic guide for improving your writing
 Elements of Style, no writer should be without this book.
 Save the Cat: Yes, it is a book about screenwriting, but I’ve seen nothing better for writing fiction.
 Nondesigners Design Book takes the mystery out of graphic design
 Type and Layout will help you make your book more readable.
 Guerrilla Marketing, the classic guide for marketing on a shoestring budget
 Platform, a great book about building a following
 The Man from Sun Prairie, a novel I wrote
 Spiritual Self Defense, a textbook I wrote
 A Beautiful Christmas, a holiday book I designed using Adobe InDesign
 Rethinking Our War on Poverty 2020 Edition, a book that I hope to make into a documentary
 Adding Value is a book I compiled and published over a weekend detailing ways I add value to your life
More resources
LibreOffice, a free alternative to Microsoft Word (scroll down for the most recent stable version)
Download GIMP, a free alternative to PhotoShop
How I Sold 1 Million eBooks in 5 Months
Dan Poynter’s Self-Publishing Manual: How to Write, Print and Sell Your Own Book (Volume 2)
1001 Ways to Market Your Books: For Authors and Publishers, 6th Edition
About Dwight Clough

I am a national award-winning writer, published author (20+ books), ghostwriter, and publishing consultant. Since 1983, I have worked on a wide range of writing projects for thousands of enthusiastic clients. I’ve helped clients write, rewrite, and publish their books.
I specialize in Christian inspirational, life story, devotional, educational and leadership books, but I’ve worked on other book projects ranging from microbiology to mental health.
You can reach me here:
Course index
Introduction: How to write and publish your book
Lesson #1: 7 Easy Steps to writing and publishing your book
Lesson #2: 7 questions you must answer before you write your book
Payment page: Before moving on
Lesson #3: Avoid these 9 common mistakes made by first-time authors
Lesson #4: What options are available to first-time authors?
Lesson #5: Is your writing good enough to be published?
Lesson #6: How to get it done: Advice for tackling your first book
Lesson #8: Elements of your book
Lesson #9: Designing your book inside and out
Lesson #10: Publishing your paperback book for free