Please don’t share this page with others as it is intended only for those who have purchased Dwight Clough’s How to Write and Publish Your Book course…
Lesson #11
How to publish your book in e-book format
In this lesson, we’re going to focus on how to create an e-book and make it available on Amazon Kindle, but we’ll also touch on creating an e-book without using Amazon’s platform. Both options are free.
Creating an e-book without using Amazon
Before we begin, however, suppose you don’t want to publish your e-book on Amazon. Suppose you want to sell it or make it available on your own website. Is there a way to do that?
Sure. LibreOffice makes it simple. You have two options: PDF and EPUB. Let’s look at both.
PDF preserves the original look of your book. That can be a plus or a minus. It’s a plus if you want each page to look a certain way. If your book contains a number of charts, diagrams, images, sidebars, and the like, then that may be a desirable feature. But it’s a minus if you’re trying to look at the same book using multiple devices with different screen sizes. You may need to scroll back and forth just to read a single line of text. That can be aggravating. PDFs can be read on almost any computer or smartphone, but not necessarily on every E-Reader.
EPUB offers the ability to “reflow” the text. In other words, while there might be 120 characters of text on a line in one screen, there might only be 40 characters of text on a line when using a smaller screen. E-Pub can be read on nearly every E-Reader except Kindle. E-Pub also offers the option of including media files (audio, video, etc.), something that PDF does not allow.
Here’s an article comparing PDF to EPUB.
We’ve previously discussed how to export the interior of your book as a PDF. So let’s talk about exporting as EPUB. From the File menu, select “Export as.”
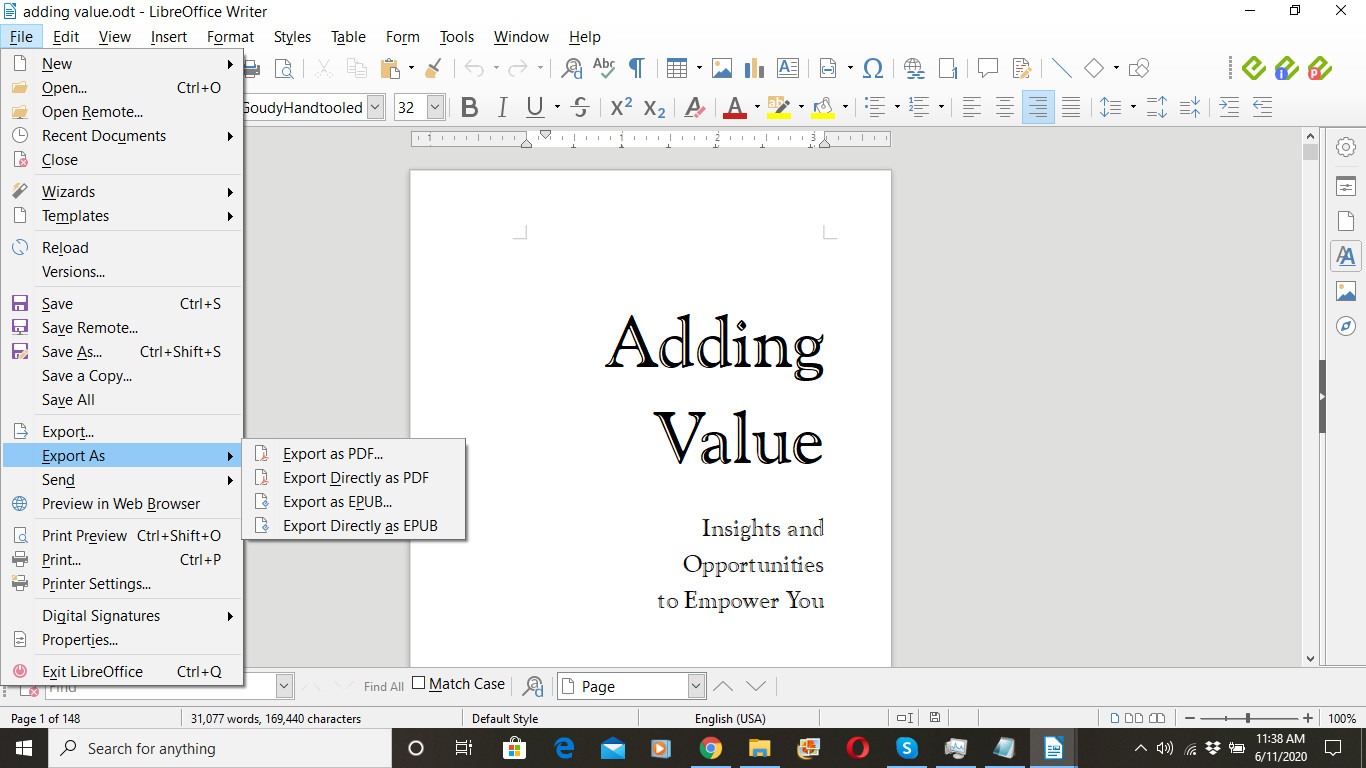
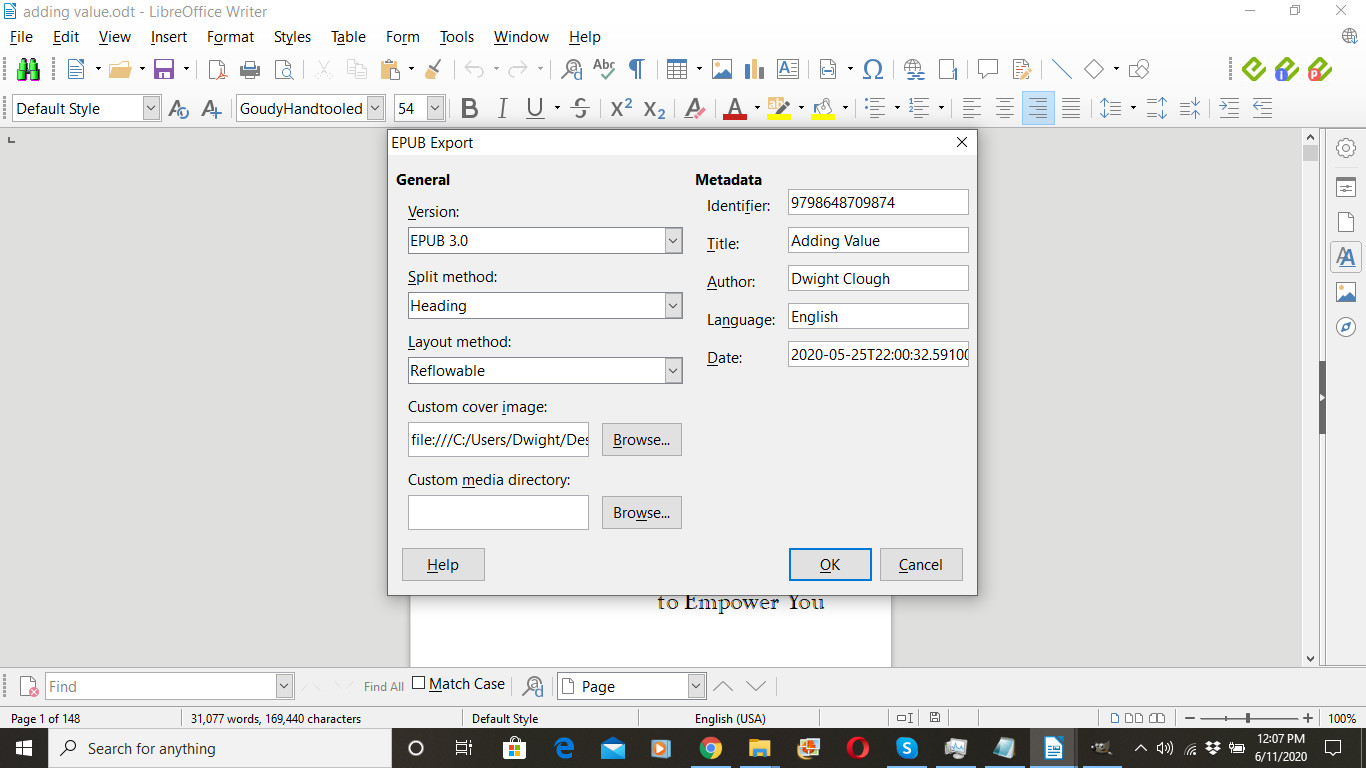
I made the following choices with the export options.
1. I selected EPUB 3.0 as the version.
2. I selected Heading as the split method, as I use Heading for my chapter titles, and I want new pages to start with new chapters.
3. I selected Reflowable as the Layout method. “Fixed” is the other option. That gives you a more PDF-like look where the text is not reflowable.
4. I created a front cover for this book and linked it in the Custom cover image. (See instructions for creating a front cover below.)
5. I didn’t have a Custom media directory.
6. I used the book’s ISBN as the Identifier.
7. I added the Title, Author, and Language.
8. LibreOffice chose the last save date as the date. I didn’t have a reason to change that.
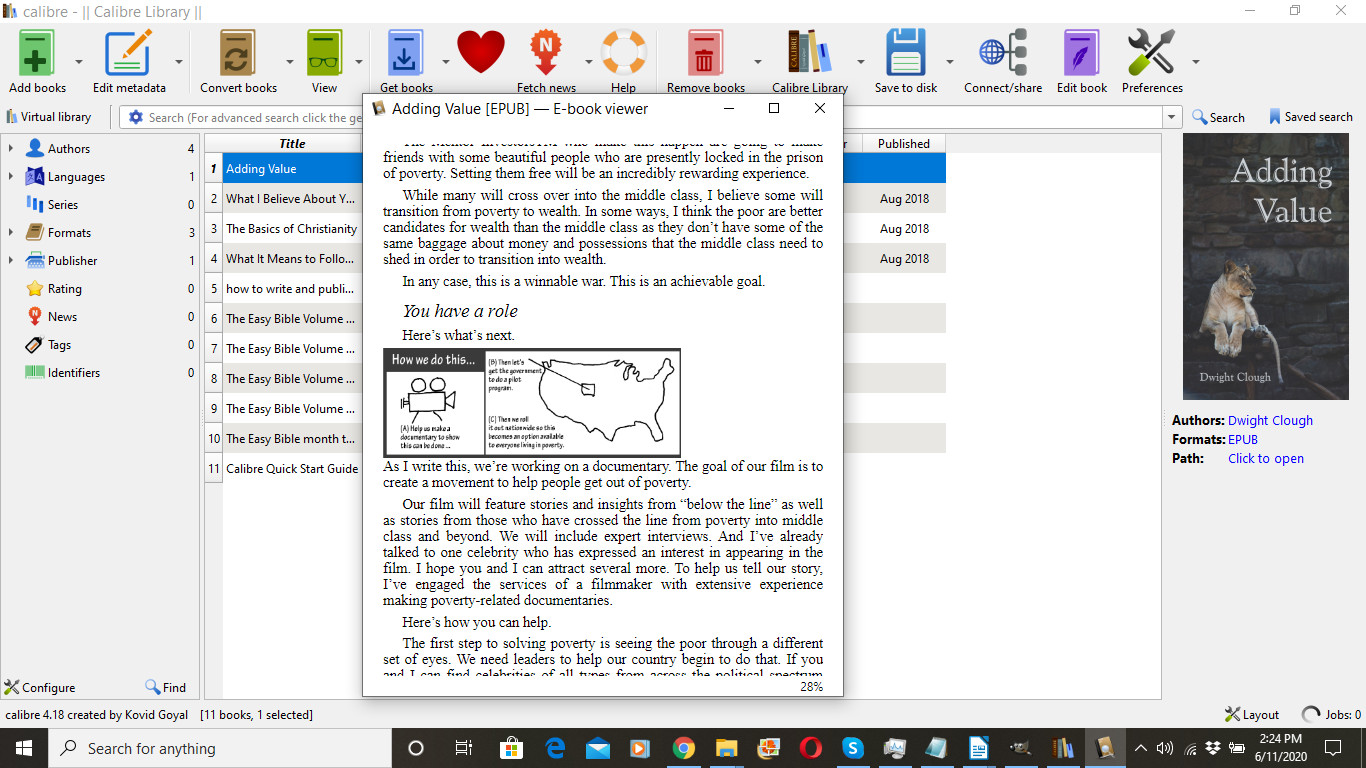
I then opened my EPUB file in an E-Reader. In this case, I happened to have Calibre installed on my laptop. (The book should be readable in almost any E-Reader except Kindle.)
In addition to selling your e-book on your own website, there are a number of other sites where you might sell your e-book. This isn’t something I specialize in, but I did find this interesting article.
Publishing your book as an e-book on Amazon
Before we return to the Amazon site, we are going to do two things with our book to get ready to publish it as an e-book on Amazon.
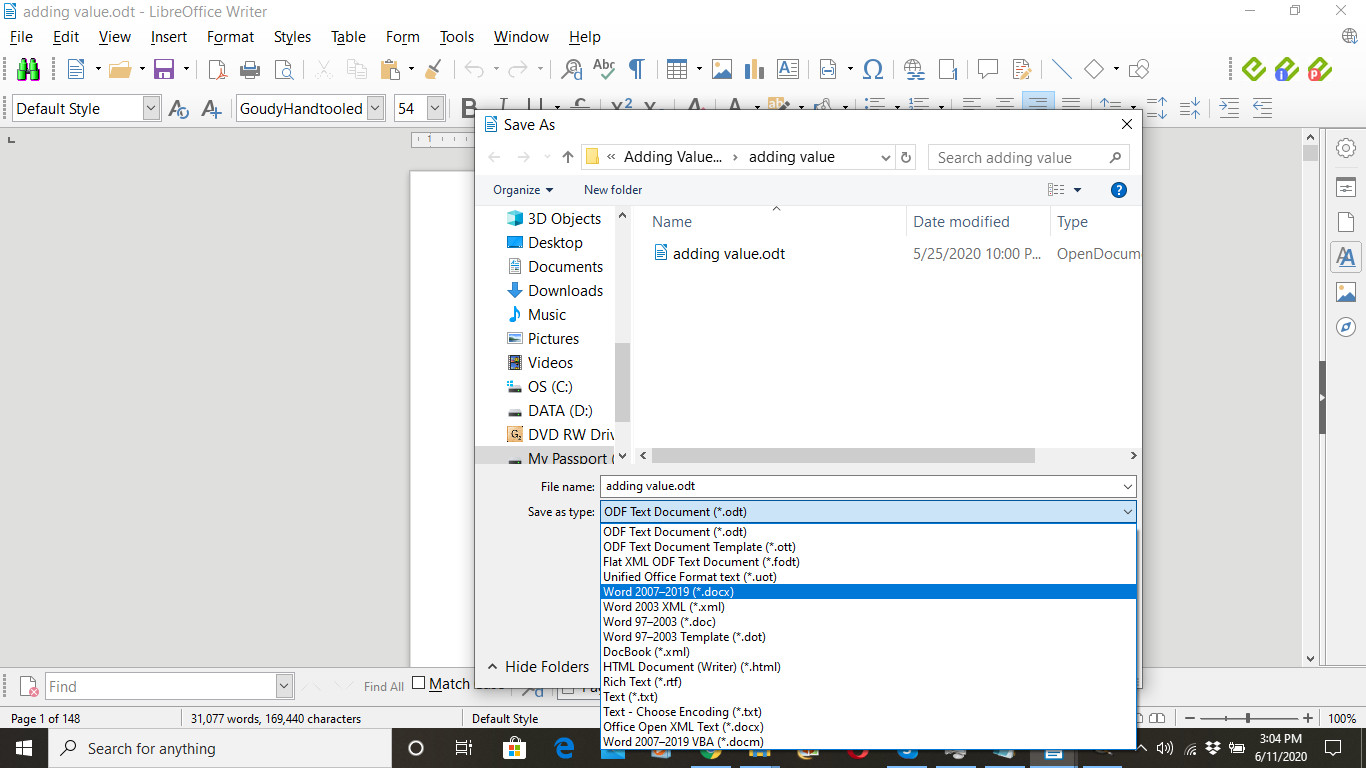
First, we’re going to convert the interior of the book to a Word Document, a *.docx file. That’s pretty easy. From the File menu, select “Save as.” Then from the drop down menu, select “Word 2007-2019 (*.docx).”
You may get an additional prompt asking you if you’re sure you want to save in Word format, and click the option that tells the software to save it in Word format.
Second, we’re going to create a front cover for the book. I’m going to assume that you’ve already created a cover for the paperback version of the book. That file won’t work for your e-book. Instead, we want a jpg version of your front cover ONLY (excluding the spine, bleed, and back cover). Here’s how we’ll do that.
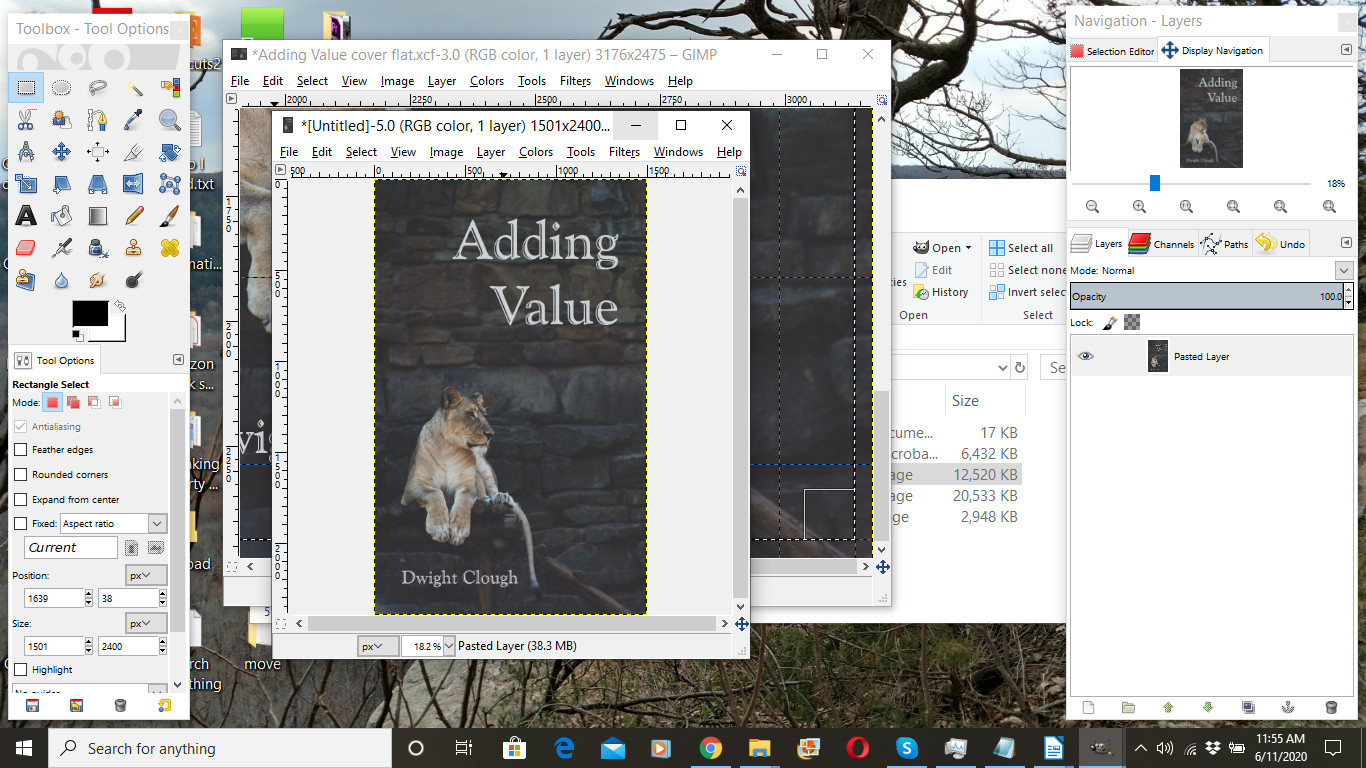
1. Open to the flattened image version of your paperback book cover.
2. Select the rectangle select tool from the tool bar
3. Select from the right edge of the spine to the bleed marks. You may need to zoom into 50% or 100% to do so.
4. Copy the selected image area to your clipboard.
5. Paste as New Image
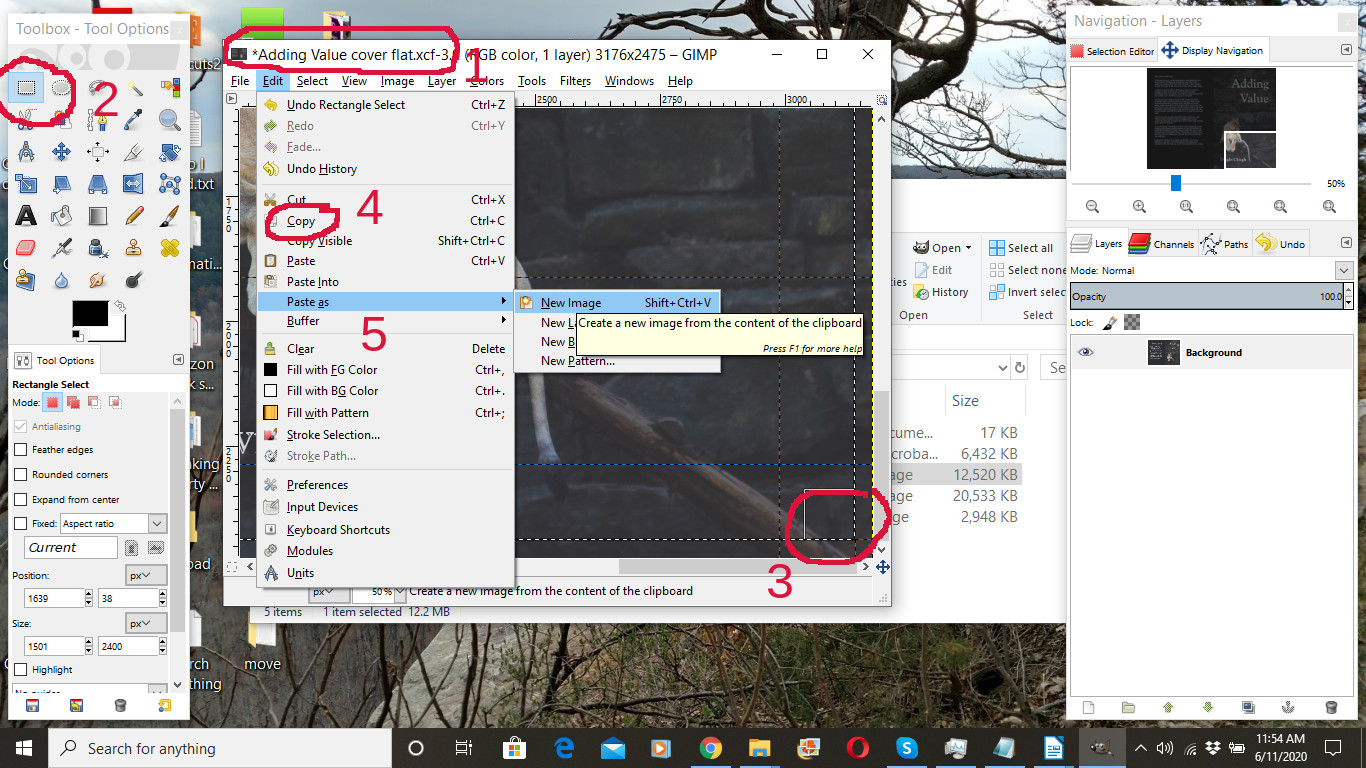
This will give you a new image window with just your front cover in it. (If you never created a paperback cover, then, of course, you’ll need to create a front cover from scratch.)
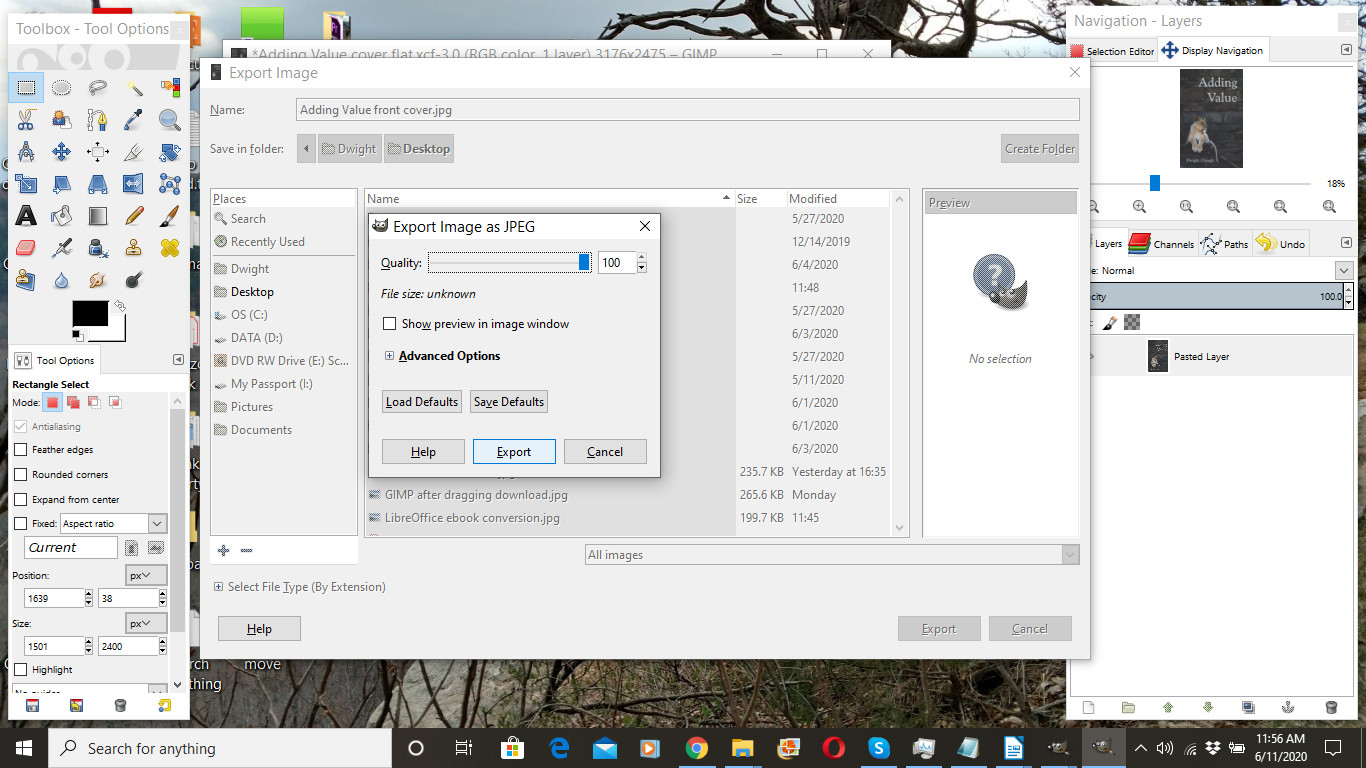
Navigating to the image you just created, you next want to export that as a *.jpg file.
1. From the File menu, select Export.
2. In the name area, give your front cover a name. Here I used “Adding Value front cover” as the name.
3. IMPORTANT: The name you give it MUST END with .jpg (notice the period just before “jpg”).
4. Click export.
5. In the “Export Image as JPEG” options window, I set the Quality at 100, and then click “Export.”
6. When you go to close the image window in GIMP, you’ll have the option of also saving the front cover as a GIMP image. I usually do not, but you certainly can.
Now, you’re ready to navigate to the Amazon publishing dashboard.
If you didn’t do the previous lesson on publishing your paperback book, then you may need the following information:
If you don’t have a (free) Amazon account, you can sign up for one. Otherwise you may use your Amazon user name and password.
IMPORTANT! Be sure you keep your Amazon user name (typically your email address) and password in a safe place so you can access your book(s) in the future. If you update your password in the future, be sure to update your records. And, since the information you are guarding is important, I recommend using a secure password to make your account very difficult to hack.
Banking and tax info
At some point, Amazon will prompt you for banking and tax information. Amazon needs this information in order to pay you, and you probably will not be able to complete the publishing process until that information is provided. You need to use your real name here as opposed to a pen name.
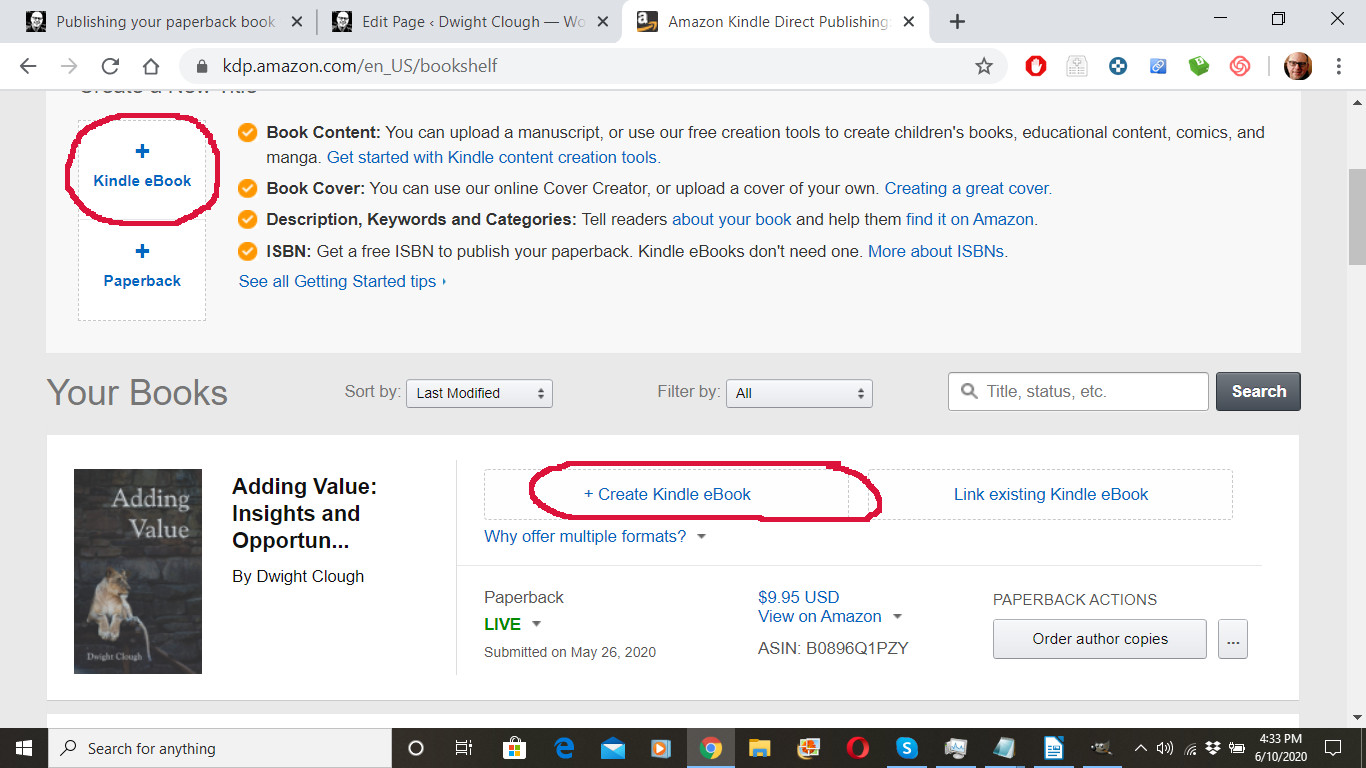
Since I already have a paperback version of my book, I’m going to select “Create Kindle eBook” next to the paperback version of my book.
If I had NOT already published a paperback version of my book, then I would select the “+ Kindle eBook” link on the far left under “Create New Title”
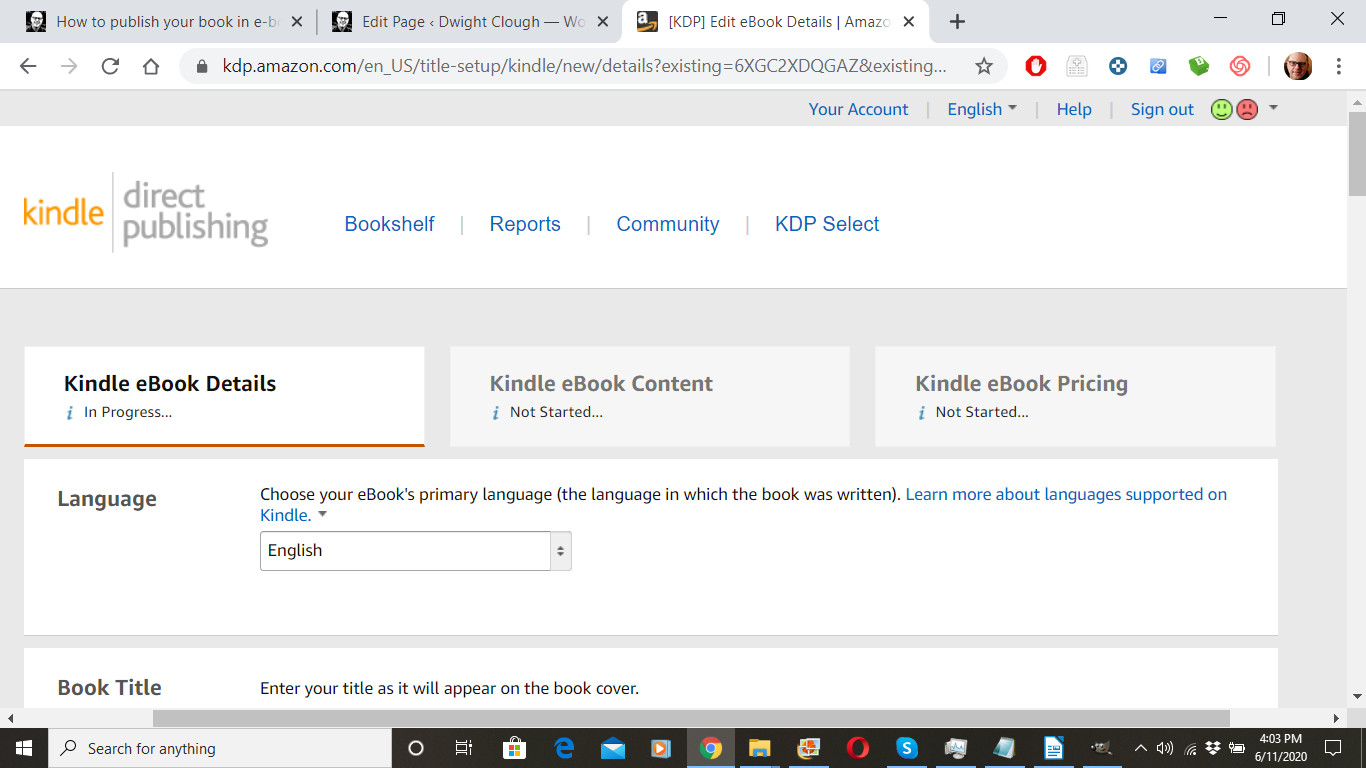
I come to the first tab of the e-book publishing process: “Kindle eBook Details.” My book’s language is already selected.
Since I’m working from the already submitted paperback version of my book, the title, subtitle, series, and edition information is already entered. If you haven’t already published as paperback, then enter the appropriate information. In some cases, you book may be part of a series, like a three volume trilogy for example. Or your book may be an updated edition of a previously published (by you) book. Series and Edition Number sections allow you to enter that information.
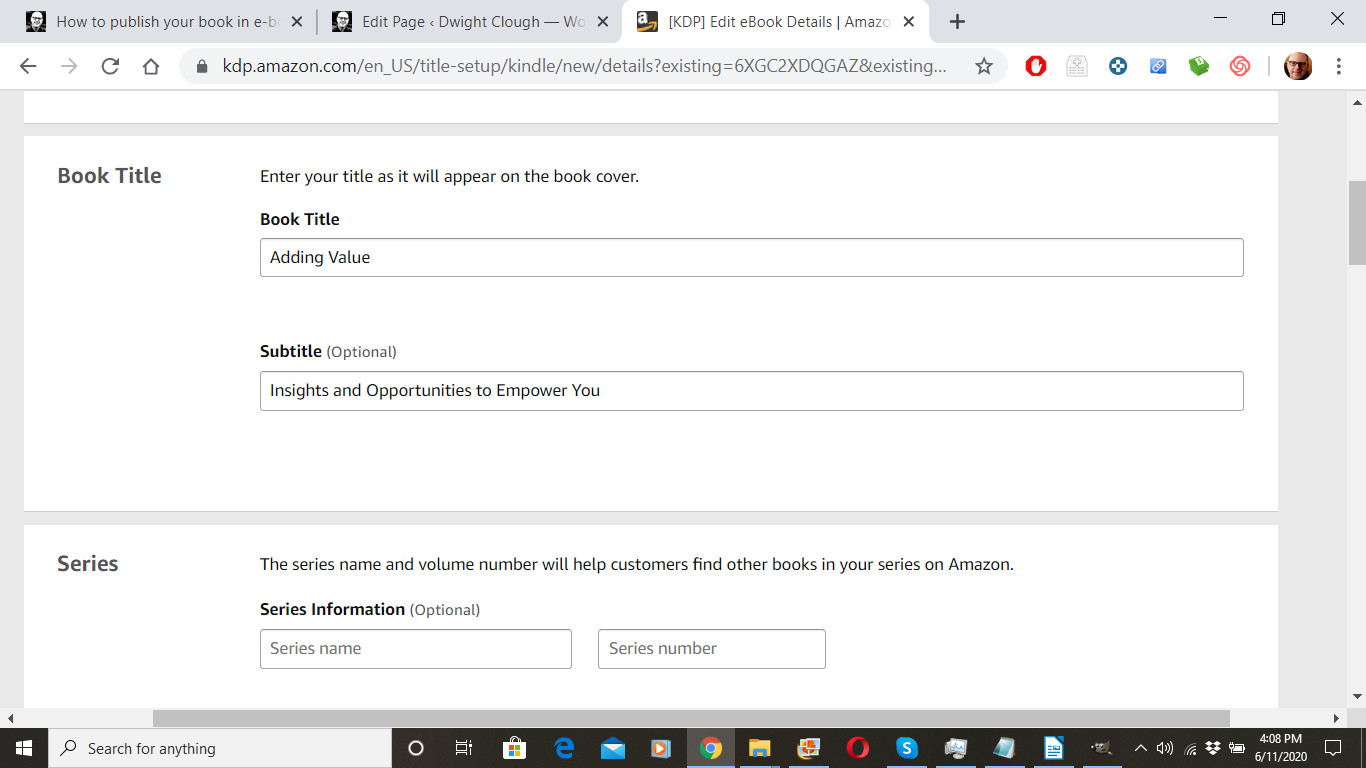
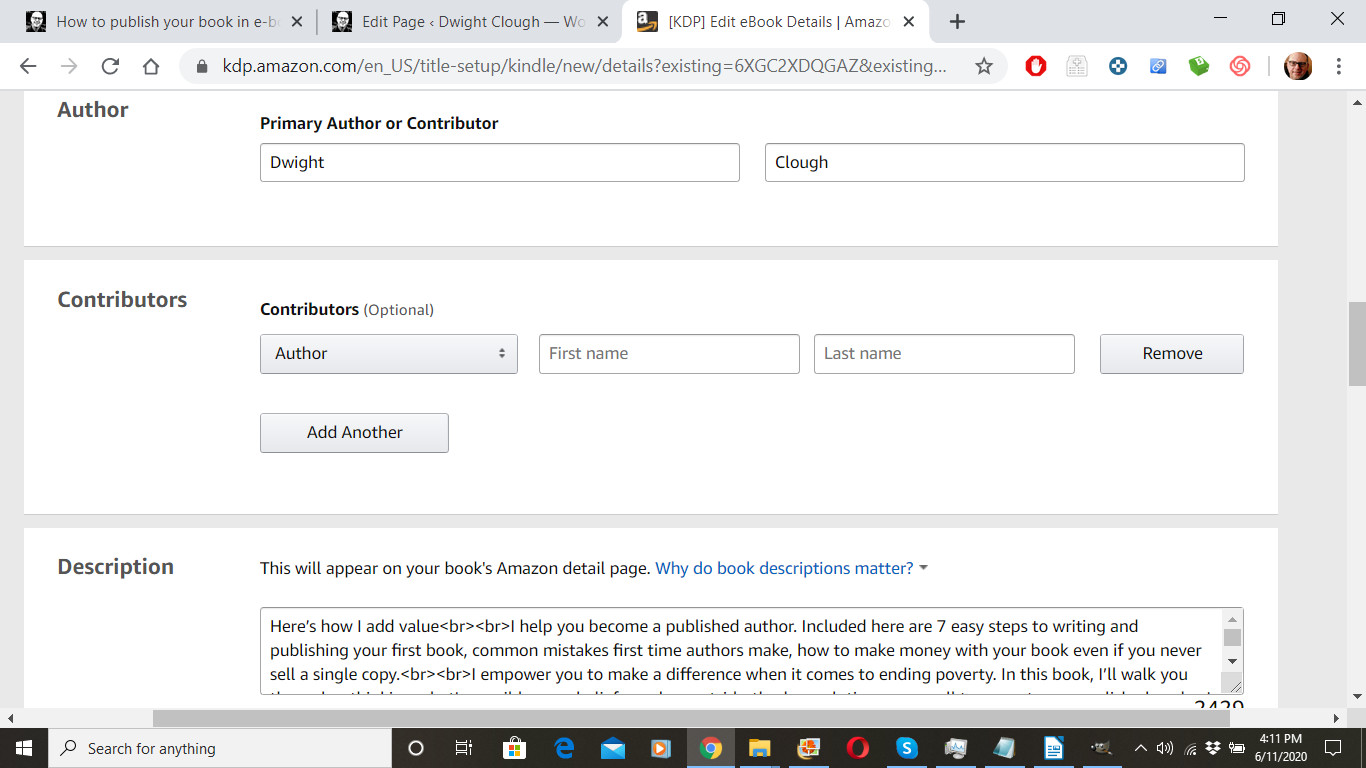
Likewise, author, contributors, and description is already entered. If you haven’t already published as paperback, then enter the appropriate information.
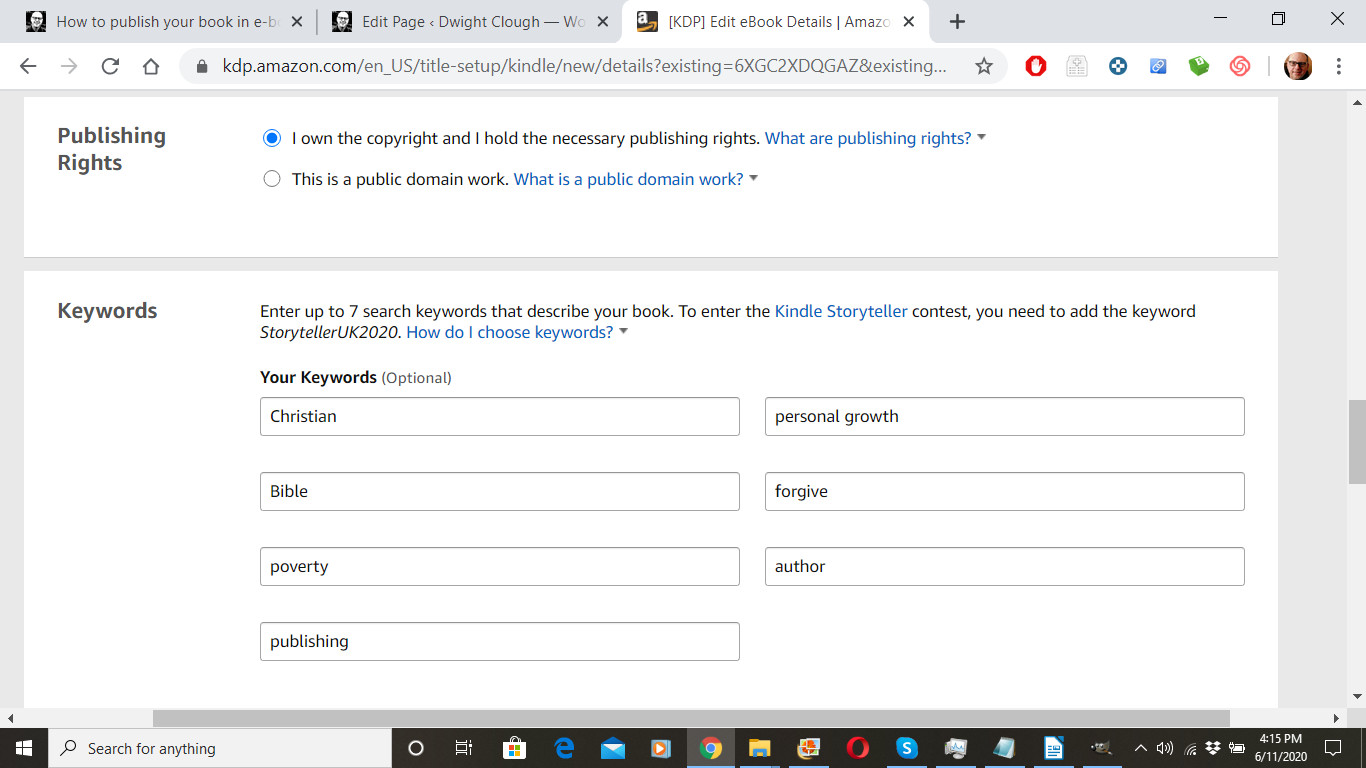
Since I’m linking this to an existing paperback version of my book, Publishing Rights and Keywords are already filled in for me. Assuming your book is original to you, and assuming you haven’t signed away your rights to some other person or entity, then you want to check, “I own the copyright and I hold necessary publishing rights.” Choose up to seven keywords to help readers find your book when they are searching for books.
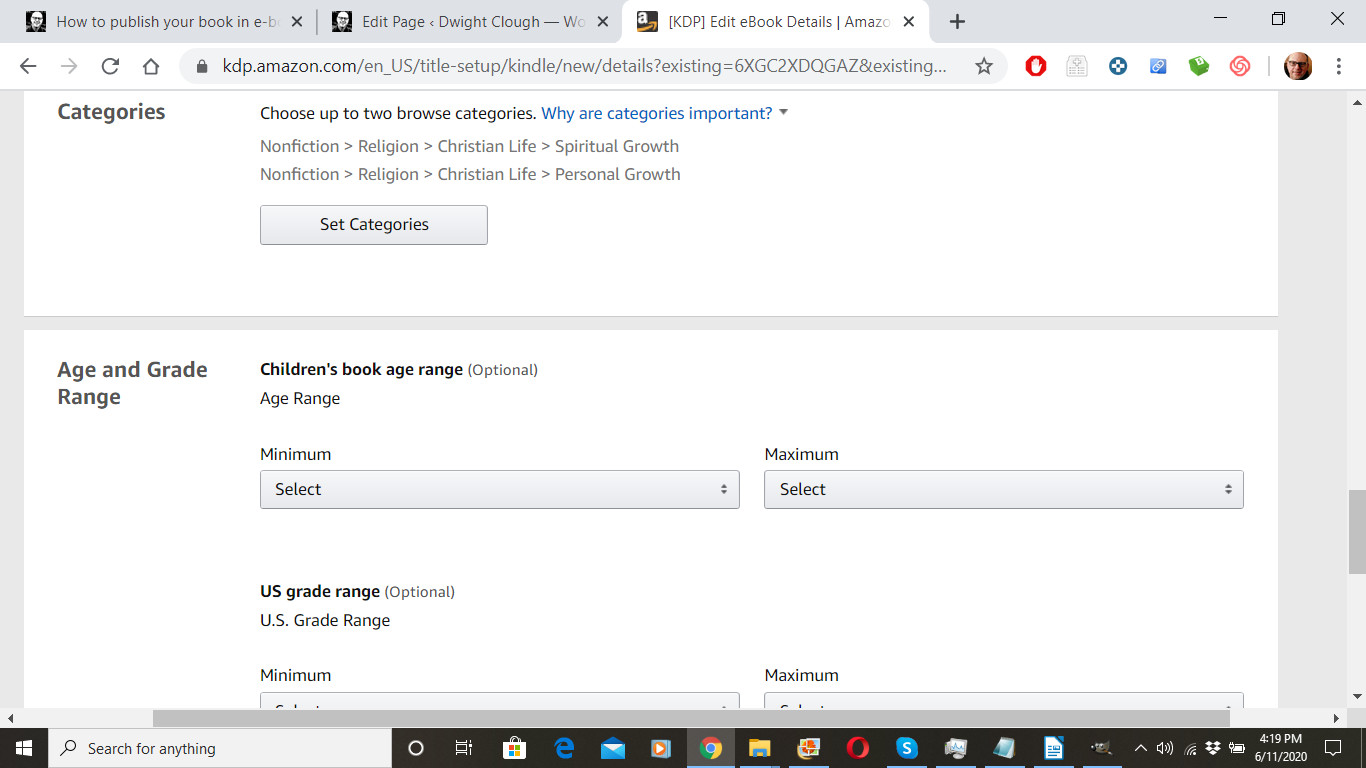
Since I have already published in paperback, categories are already selected to match my paperback book, and there is no need to change them. If you have not already published in paperback, you will want to choose up to two categories for your book. When you click on “Choose Categories,” you’ll find an expandable drop down menu. In the case with the book pictured here, I’m using the book as a “brochure” and resource covering a range of products, services, ideas, and stories. The book summarizes the many things I offer my world. So I picked two categories that I wanted to be searched under, even though several other categories might apply.
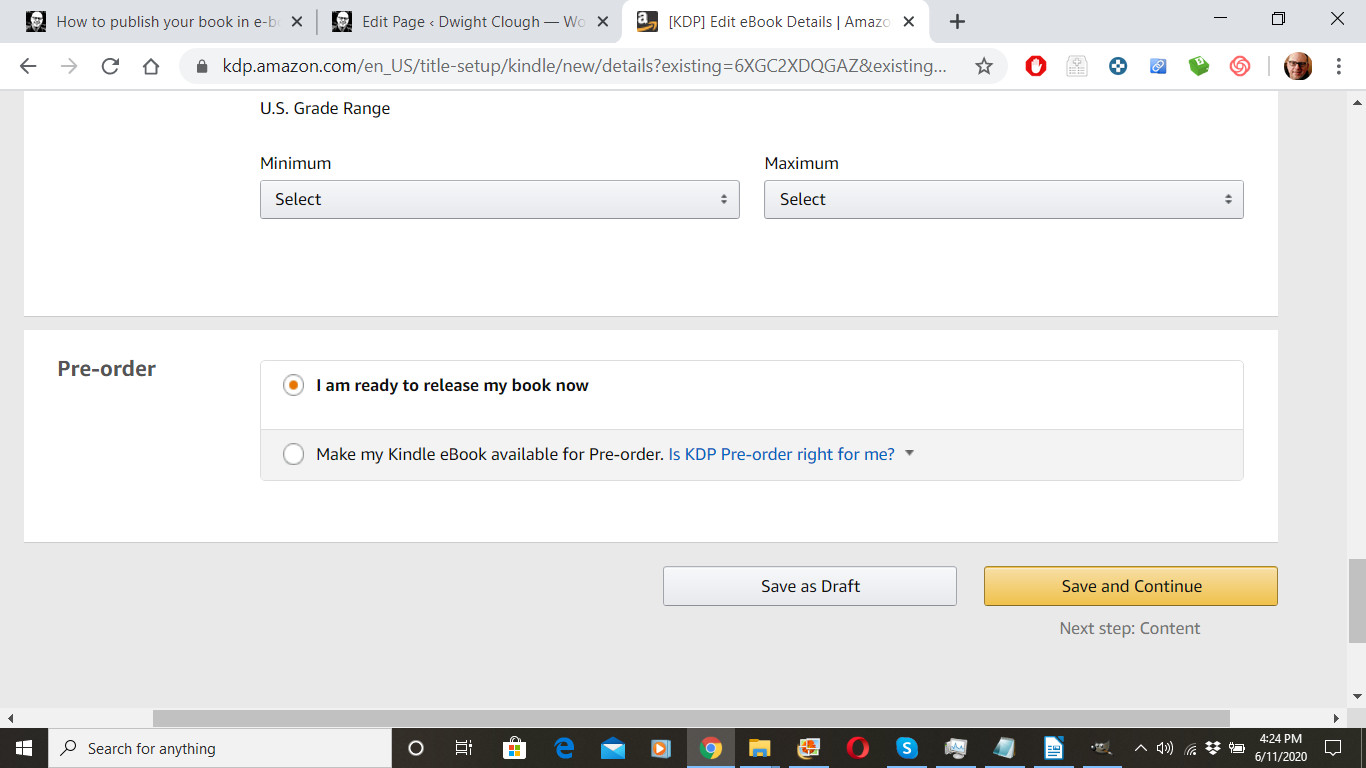
Since I don’t normally publish books for children, I don’t enter any information here under “Age and Grade Range,” but, if appropriate, enter the information that will help your book find the correct reader.
Under “Pre-order,” I normally select, “I am ready to release my book now.”
Select “Save and Continue” to move on to the next tab.
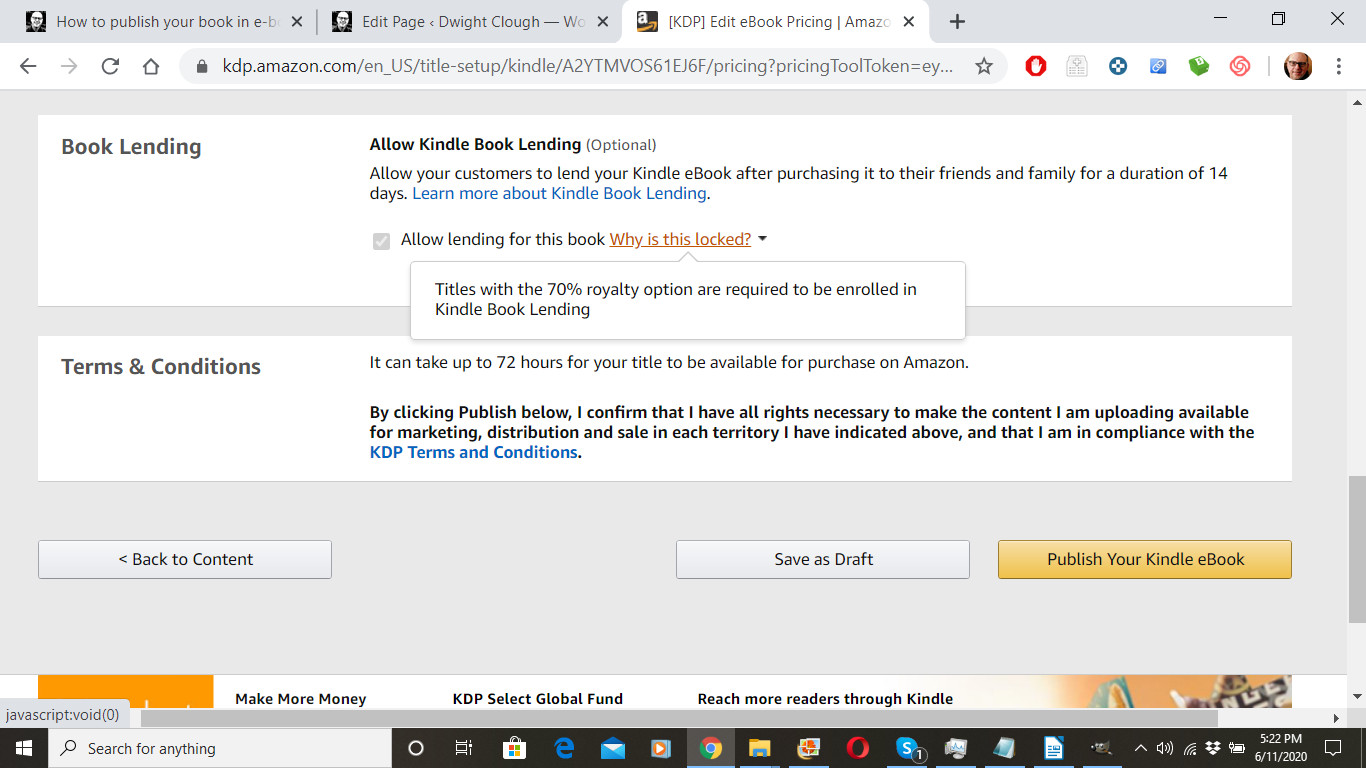
Next you want to decide whether to select Digital Rights Management or DRM. While I opted for this in the past, with recent books I’ve decided against it. DRM gives you a little more protection, but it makes it impossible for readers to “loan” your book to others and, in so doing, create a buzz for your book. It’s up to you, but I recommend selecting “No.”
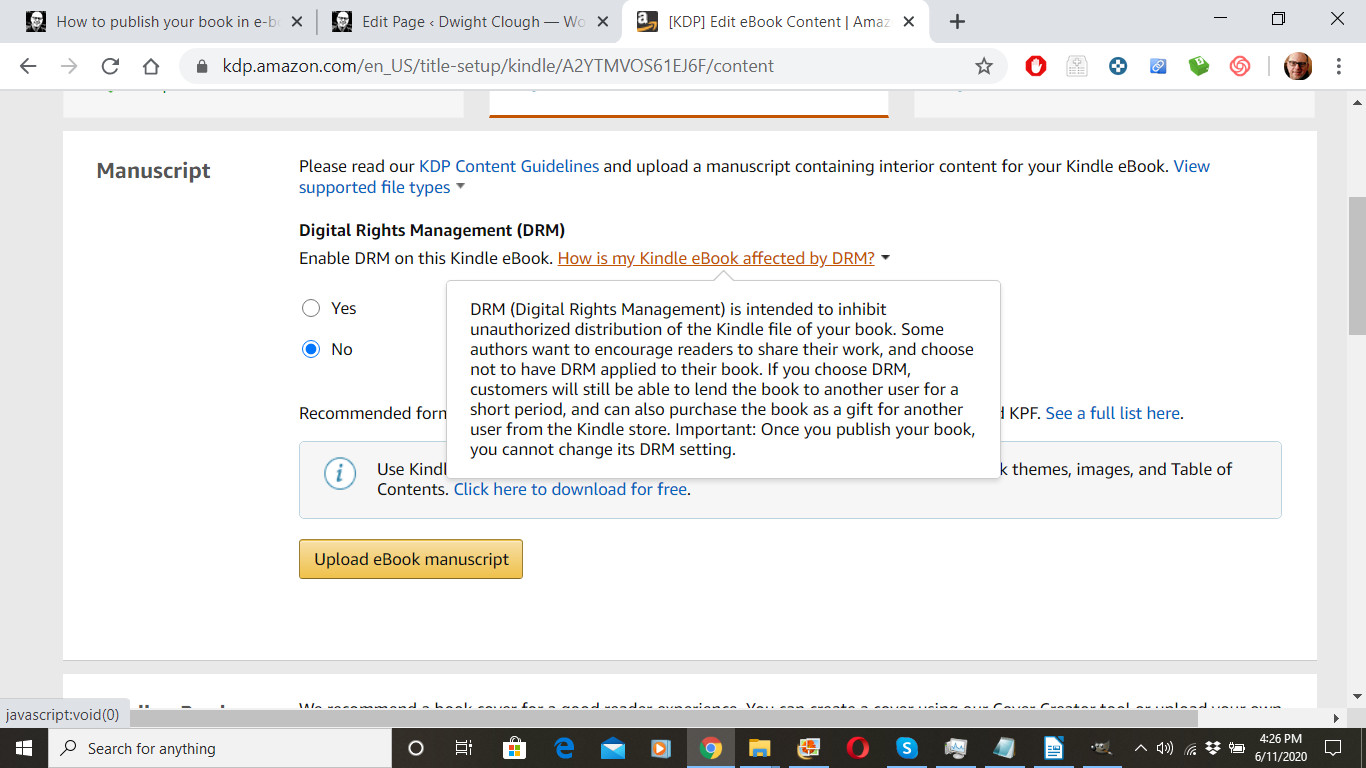
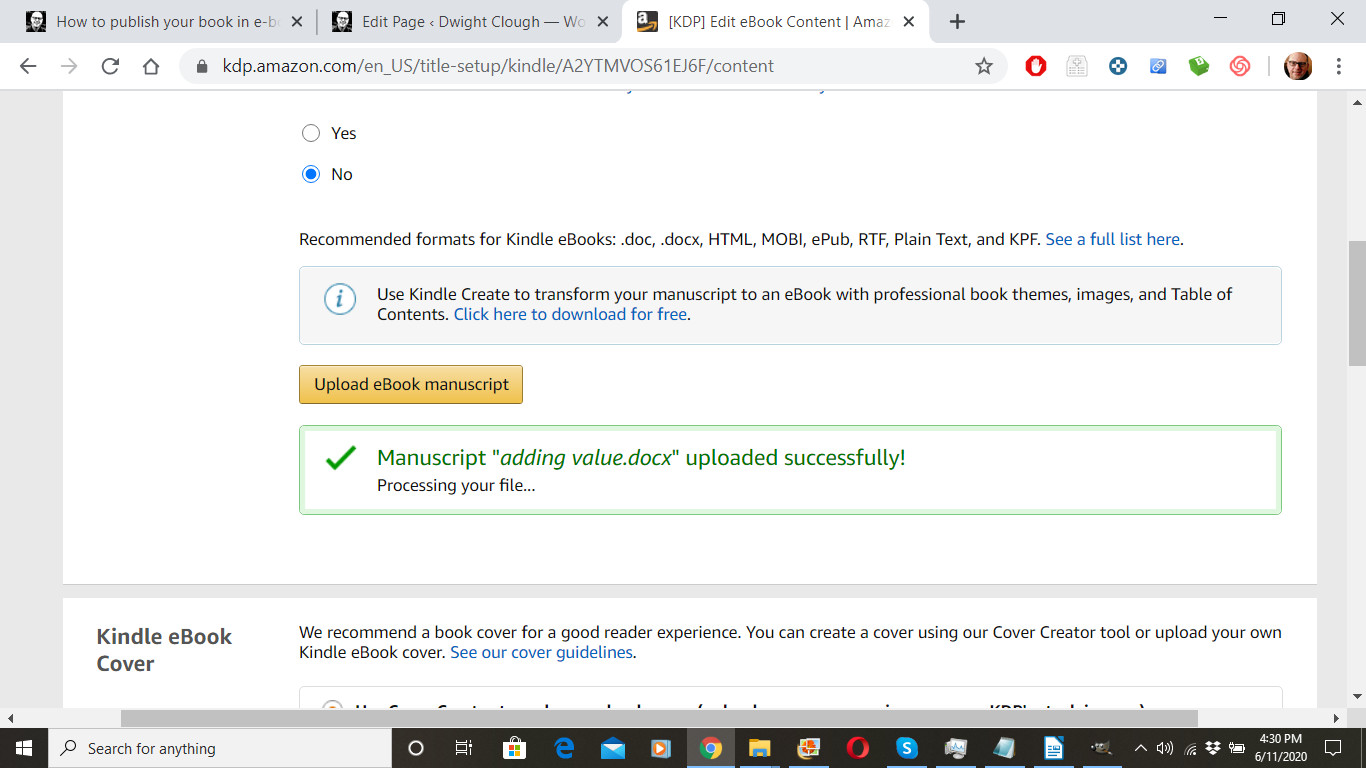
Now you’ll want to upload your manuscript. Select “Upload eBook Manuscript,” locate the *.docx file you created for your e-book, select it, and click “open.”

After you upload, you’ll see a message that Amazon is processing your file.
Under “Kindle eBook Cover,” we’re going to select “Upload a cover you already have (JPG/TIFF only),” and click on “Upload your cover file. Then locate the front cover JPG image you created, and upload it here. After a few moments of processing, your cover should appear.

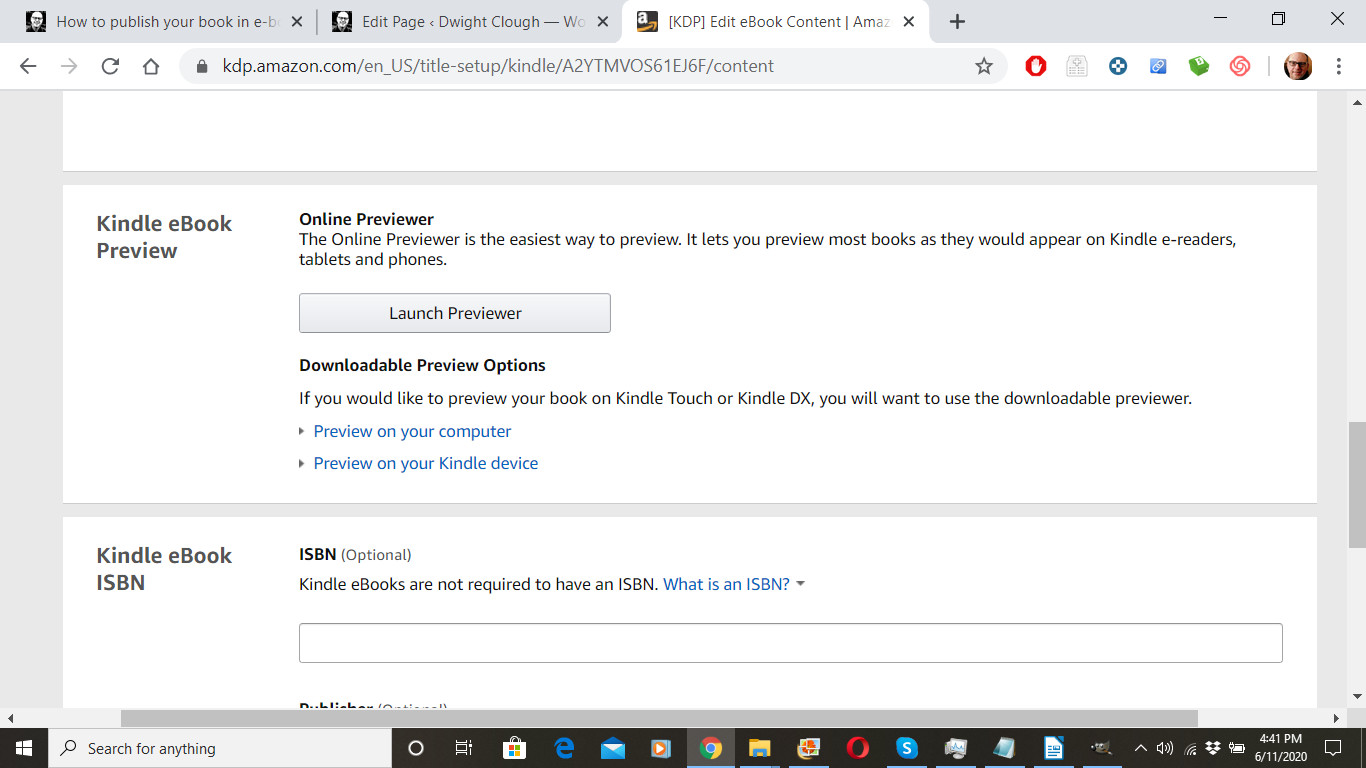
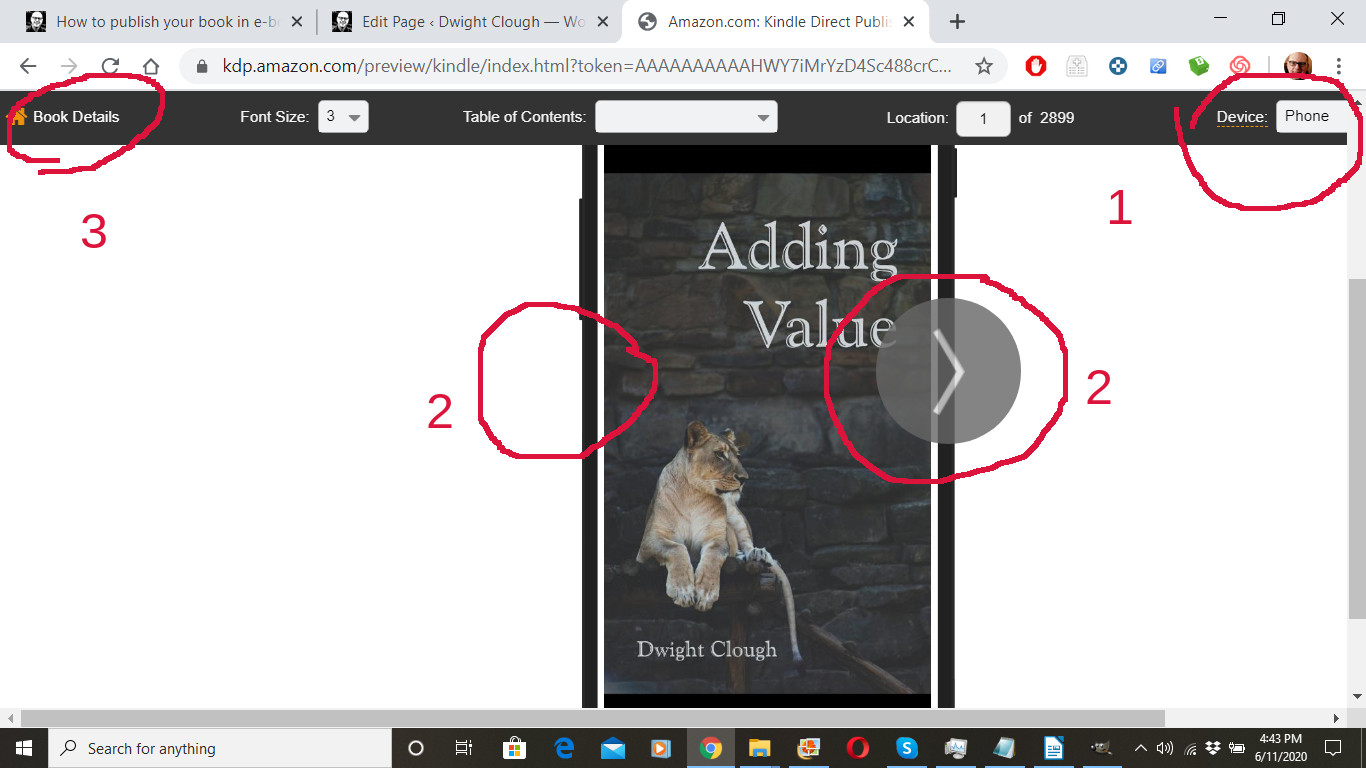
Next under “Kindle eBook Preview,” we’re going to select “Launch Previewer.” (I’ve tried the other downloadable options as well, but the online one works the best for me.)
Once the previewer launches, you can
1. Select the device you’d like to preview your book on.
2. Scroll back and forth through your book by clicking on either side of the image.
3. Return to the publishing process when you’re finished by clicking “Book Details” in the upper left.
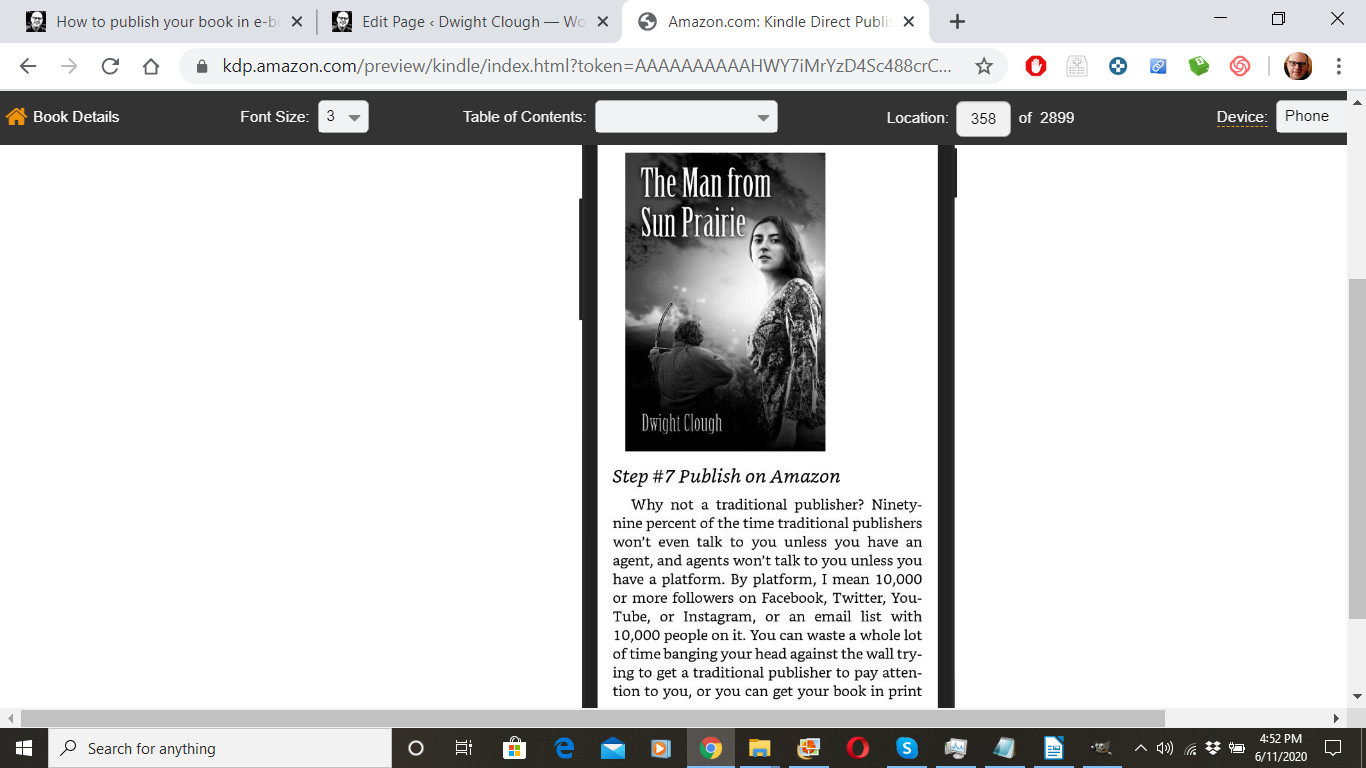
Because I created an automatically generated Table of Contents in LibreOffice, I now have a clickable Table of Contents in my ebook. If you do too, check to make sure it works.
Overall I’m happy with how it looks. If you see things you want to change, edit the *.docx file and upload it again, and preview again.
After returning to the publishing page, we come to “Kindle eBook ISBN.” E-books may have an ISBN, but they don’t need one. Amazon will NOT supply a FREE ISBN for your e-book. I never bother to add an ISBN to the e-book, but you can purchase one from Bowker and add it if you wish.
Next click “Save and continue” to move on to the third tab in the set up process.

Next you’ll want to decide if you want to enroll your e-book in KDP Select. You’ll want to look over this article to make your decision.
kdp.amazon.com/en_US/help/topic/G200798990
I’m choosing NOT to enroll mine as I want to make my book available as an e-book on my website, and I can’t do that without violating the terms of the KDP Select program.
Again, I’m going to select All territories (worldwide rights).
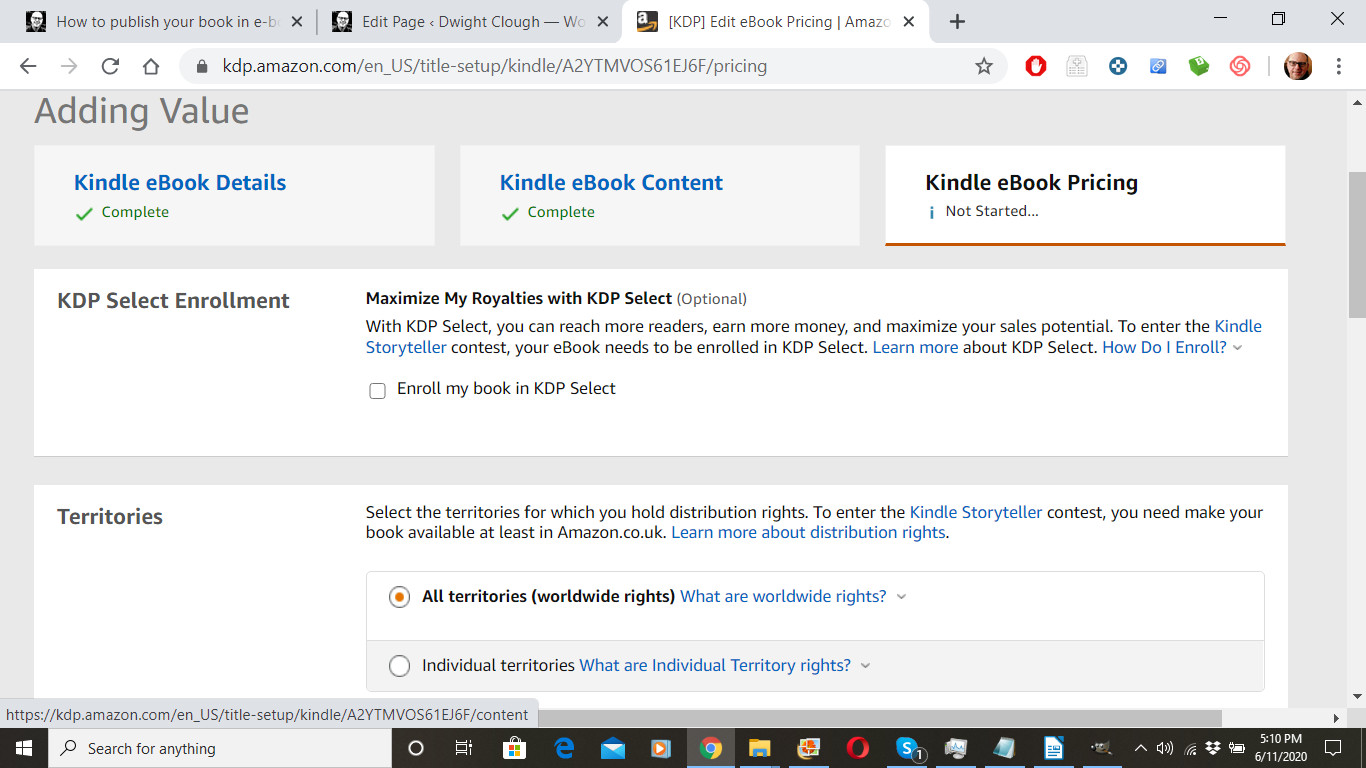
Next we come to “Royalty and Pricing.” Amazon does offer KDP Pricing Support. We’ll click “View Service.”
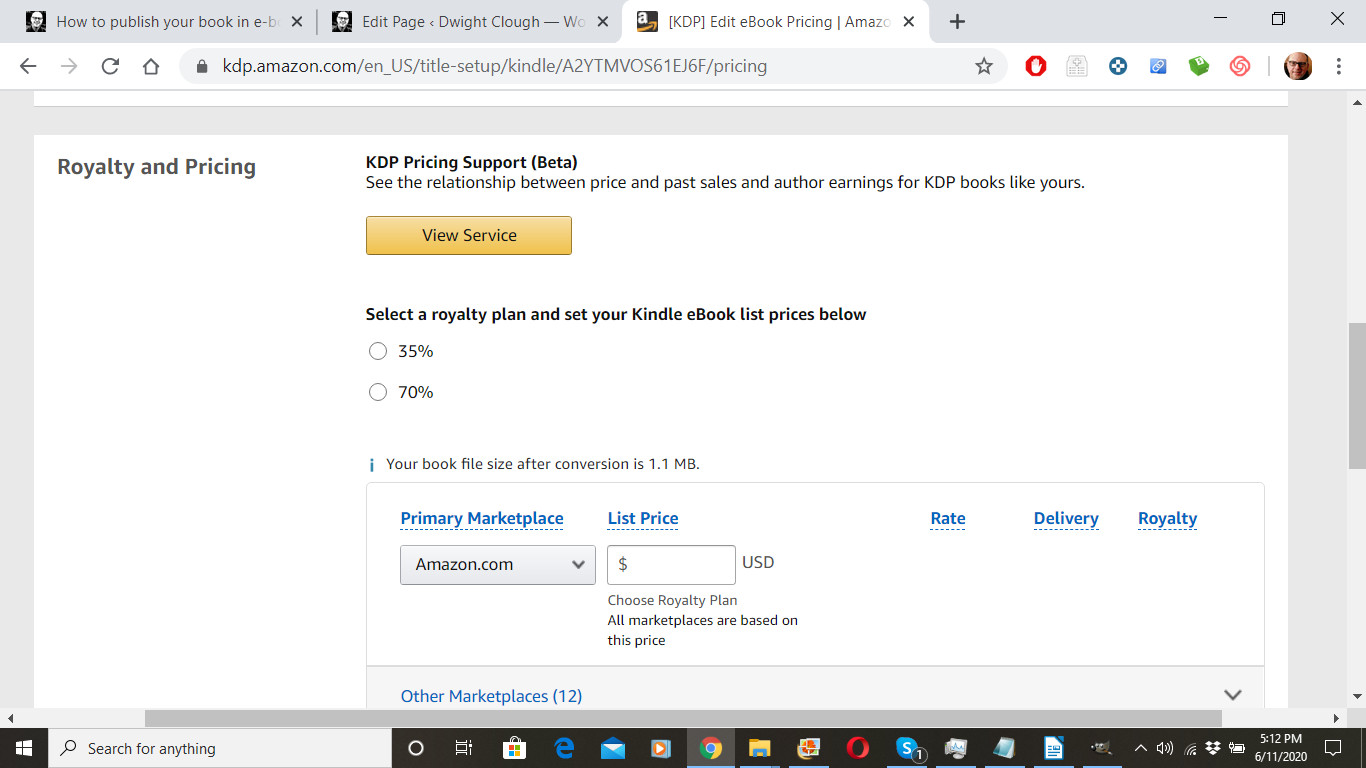
Hmm. According to this, highest author earnings for books of this type is at $3.69. I’ll try it, and I can always change the price later.
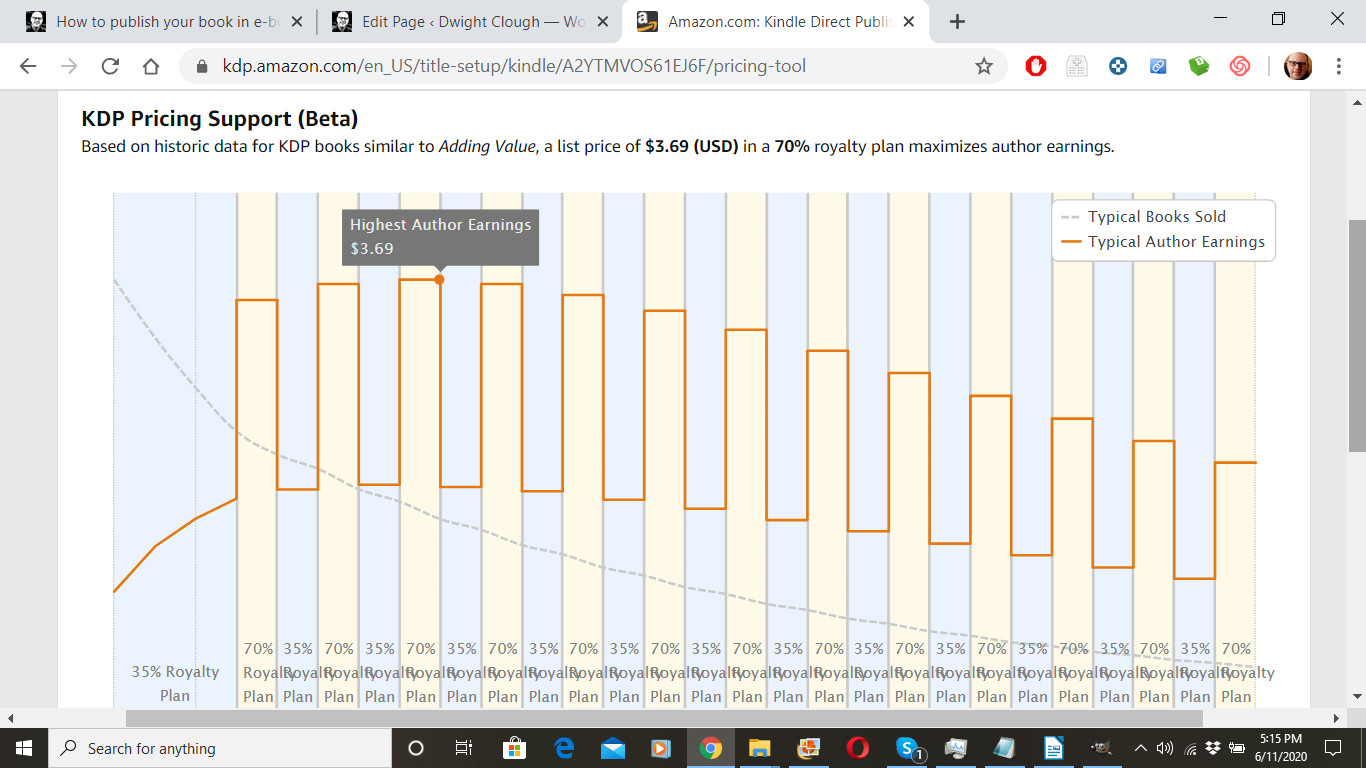
I scrolled down and clicked yes, which filled in the price and the commission structure for me.
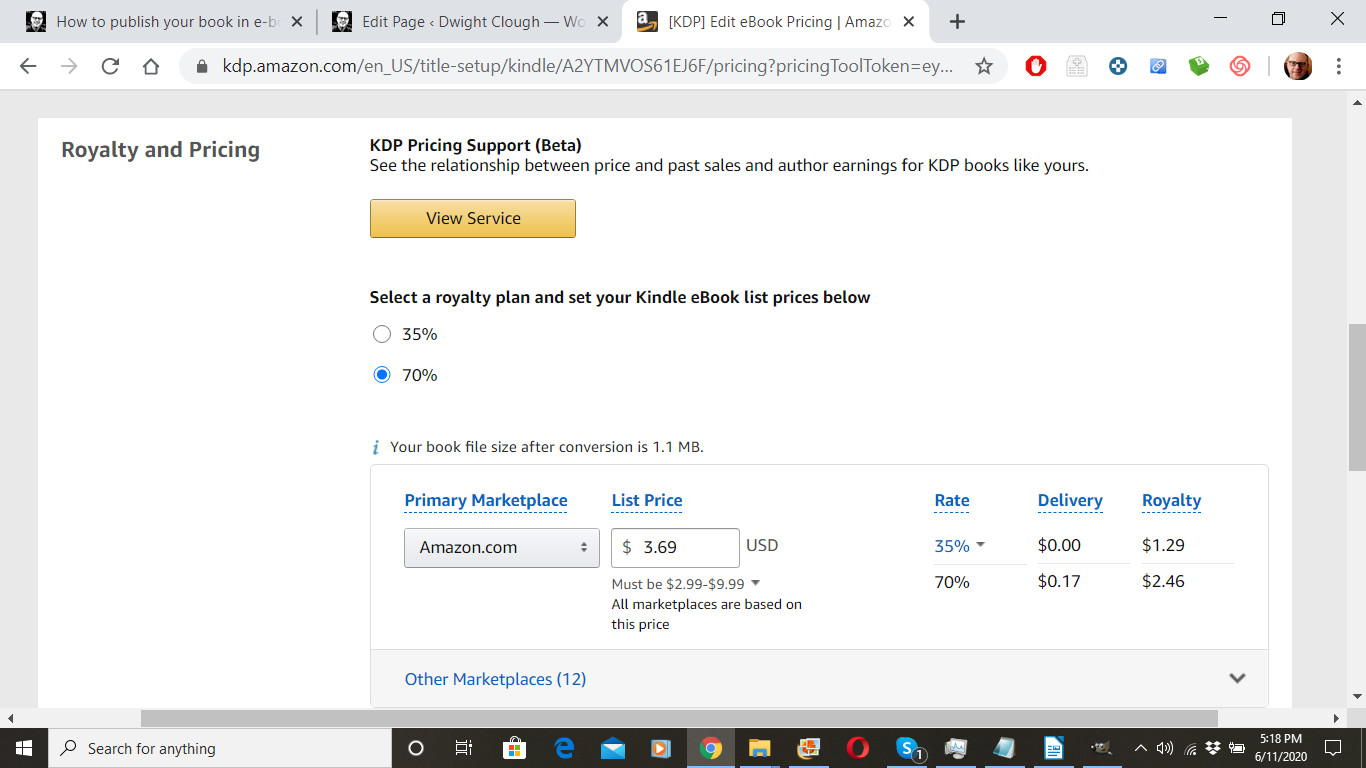
Amazon Kindle offers two different royalty plans: 70% or 35%. I usually go with the 70% plan. However, it does limit my price to a value between $2.99 USD and $9.99 USD. In addition, it deducts the cost of delivery of the book before calculating the royalty. With some books that are graphic intensive, or with some books that are best priced outside this range, the 35% royalty is more appropriate.
Finally, I’m going to click “Publish Your Kindle eBook.”
Now I’ve been returned to my author’s dashboard. You can see that the e-book version of my book is “In Review.” Amazon will look at the e-book and will generally approve or reject it within the next 2-3 days. I should get an email letting me know when the book is live.
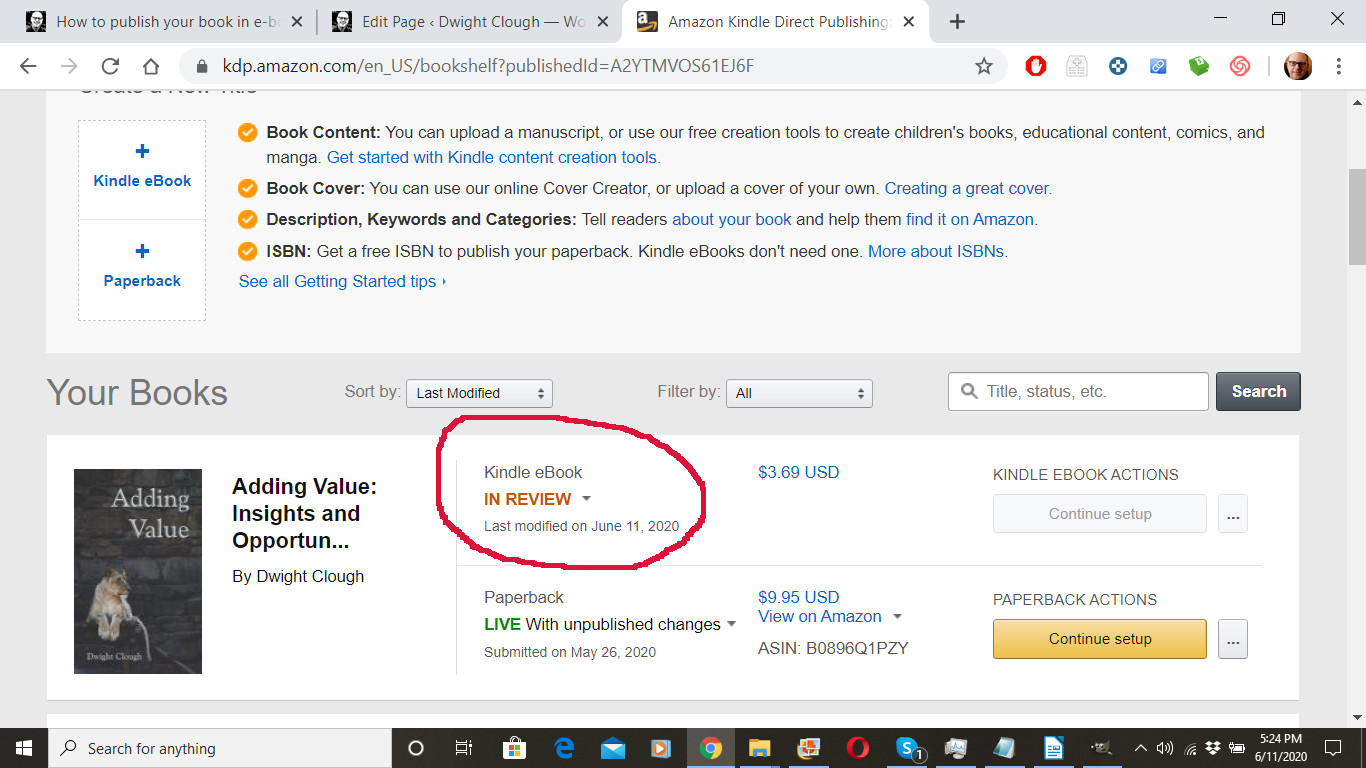
UPDATE: A few hours after writing the above, I received an email from Amazon letting me know that the Kindle e-book version of my book is live. It may take several days before the Kindle e-book and paperback versions both show up on the same Amazon sales page, but the books are live and they are linked.
Congratulations! You are now a published e-book author.
Rejections
Does Amazon ever reject e-book submissions? Yes, sometimes. For example, I was working with a client who had written a book about the COVID-19 pandemic, and Amazon chose to reject the book because it was about the pandemic but is was not from an “official source.” The paperback version of his book published fine, but the e-book did not.
Rejections are rare. If your book is rejected, you can always contact Support and try to make your case.
If you want information on royalties and payments, click reports at the top of the page.
Coming up!
Feeling overwhelmed? Here’s some good news? You don’t need to do this alone. There are good people who can help you with any aspect of your book project. I’ll help you understand what you options are, and what you should look for in the person you work with.
Course index and link to next lesson are below
Recommended resources and sample books
Yes, these are referral links so there is a danger that I might make money if you click through and purchase…

 On Writing Well, a classic guide for improving your writing
 Elements of Style, no writer should be without this book.
 Save the Cat: Yes, it is a book about screenwriting, but I’ve seen nothing better for writing fiction.
 Nondesigners Design Book takes the mystery out of graphic design
 Type and Layout will help you make your book more readable.
 Guerrilla Marketing, the classic guide for marketing on a shoestring budget
 Platform, a great book about building a following
 The Man from Sun Prairie, a novel I wrote
 Spiritual Self Defense, a textbook I wrote
 A Beautiful Christmas, a holiday book I designed using Adobe InDesign
 Rethinking Our War on Poverty 2020 Edition, a book that I hope to make into a documentary
 Adding Value is a book I compiled and published over a weekend detailing ways I add value to your life
More resources
LibreOffice, a free alternative to Microsoft Word (scroll down for the most recent stable version)
Download GIMP, a free alternative to PhotoShop
How I Sold 1 Million eBooks in 5 Months
Dan Poynter’s Self-Publishing Manual: How to Write, Print and Sell Your Own Book (Volume 2)
1001 Ways to Market Your Books: For Authors and Publishers, 6th Edition
About Dwight Clough

I am a national award-winning writer, published author (20+ books), ghostwriter, and publishing consultant. Since 1983, I have worked on a wide range of writing projects for thousands of enthusiastic clients. I’ve helped clients write, rewrite, and publish their books.
I specialize in Christian inspirational, life story, devotional, educational and leadership books, but I’ve worked on other book projects ranging from microbiology to mental health.
You can reach me here:
Course index
Introduction: How to write and publish your book
Lesson #1: 7 Easy Steps to writing and publishing your book
Lesson #2: 7 questions you must answer before you write your book
Payment page: Before moving on
Lesson #3: Avoid these 9 common mistakes made by first-time authors
Lesson #4: What options are available to first-time authors?
Lesson #5: Is your writing good enough to be published?
Lesson #6: How to get it done: Advice for tackling your first book
Lesson #8: Elements of your book
Lesson #9: Designing your book inside and out
Lesson #10: Publishing your paperback book for free